• about us
  • Books
  • Merchandise

cabinorganic

~ For people who are passionate about respecting the earth, walking in nature, observing wildlife, local diet, making do, repurposing, organic gardening, foraging for wild plants and fungi, natural health, scrumptious healthy cooking, renovations, DIY, crafting, raising children simply and mindfully, taking time for stillness, and living in harmony with the seasons.

cabinorganic

Category Archives: cook

pickled eggs

05 Tuesday Jun 2018

Posted by Delena Rose in preserve

≈ 3 Comments

Tags

eggs, pickled eggs, preserving eggs, what to do with extra eggs

IMG_2038

Until recently, my only experience with pickled eggs was peeking through the window of an old pub and spying on the ones in gallon jars that were lined up on the worn wooden counters. It never occurred to me that I could order one just to try it. I’m not a big fan of pickles or sour things so to spoil a perfectly boiled egg by drowning it in vinegar just seemed wrong.

Three years ago we set up a chicken coop and got our first chickens and for the first time in my life I became spoiled with a daily supply of freshly laid eggs. Once you have had this experience there is just no turning back.

IMG_8386 (1)

When you have your own chickens, you sometimes find yourself in a position of having too many eggs in your refrigerator. We sell our eggs to a few choice friends and neighbors but sometimes people go on holidays or just don’t need eggs that week. As our hens lay around 18-22 eggs per day, keeping the eggs from accumulating in our fridge can be a bit challenge. When I have a surplus, I bake more often, make eggs benedict for breakfast, and crème brulee for dessert. My neighbor has inspired me to try soufflé… I’ll let you know how that goes.

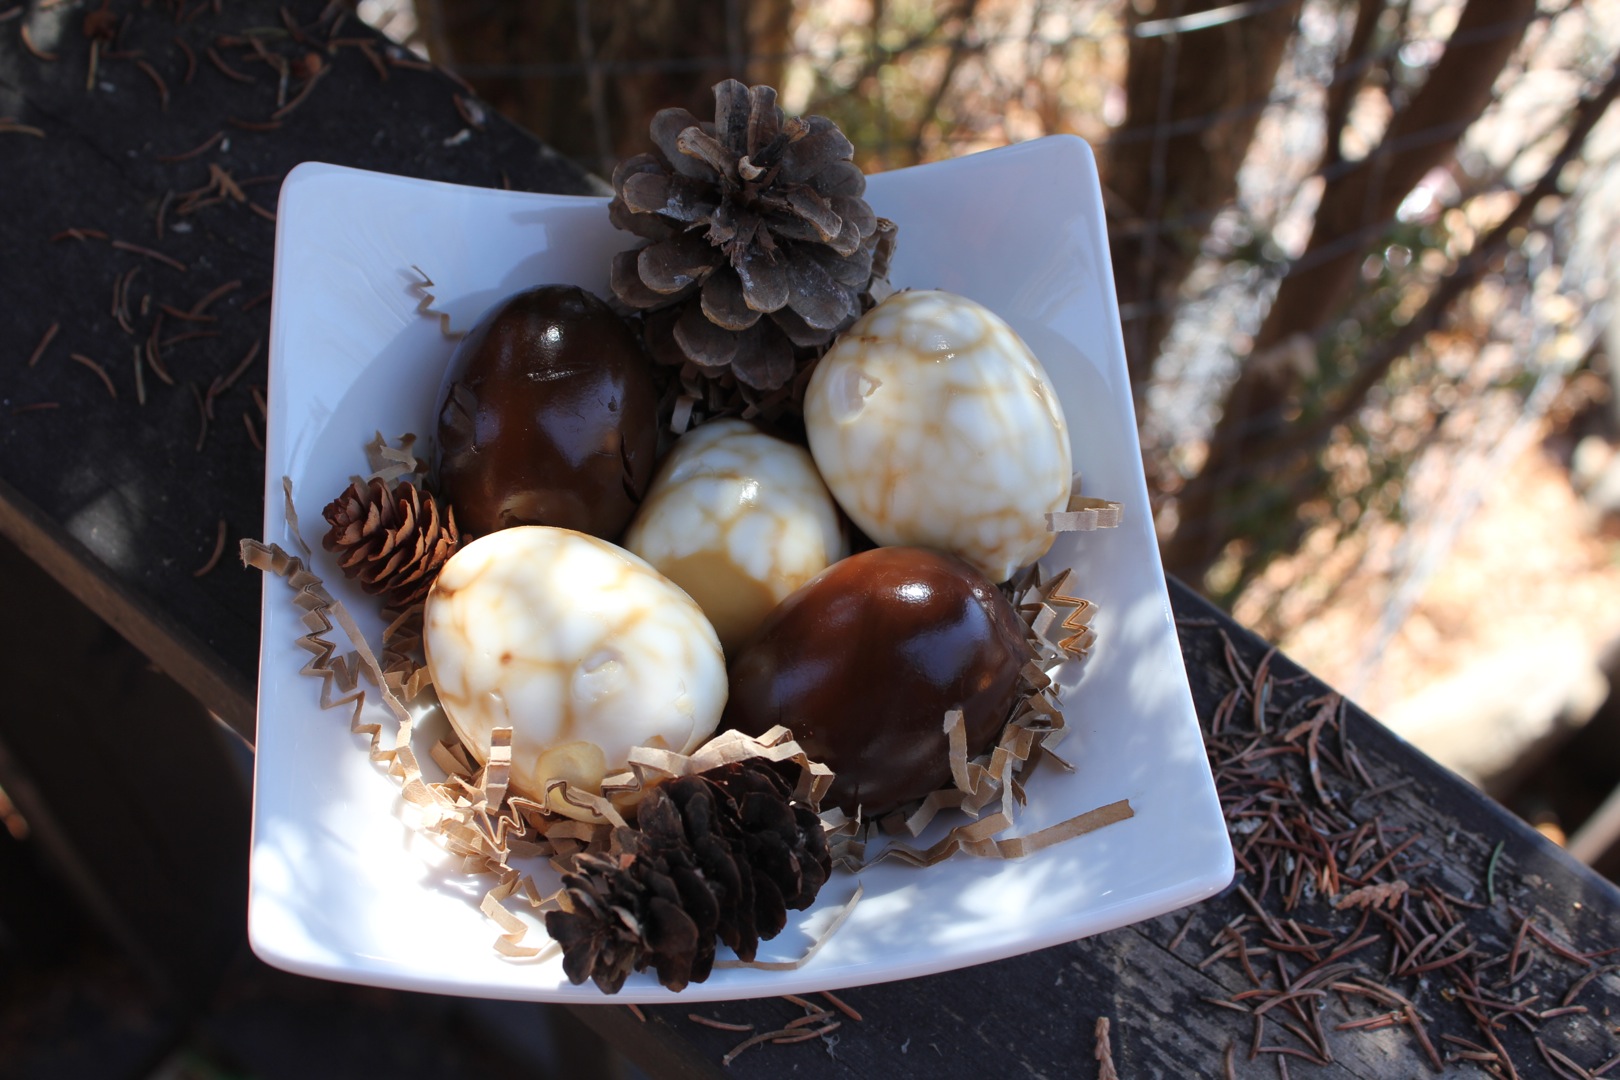
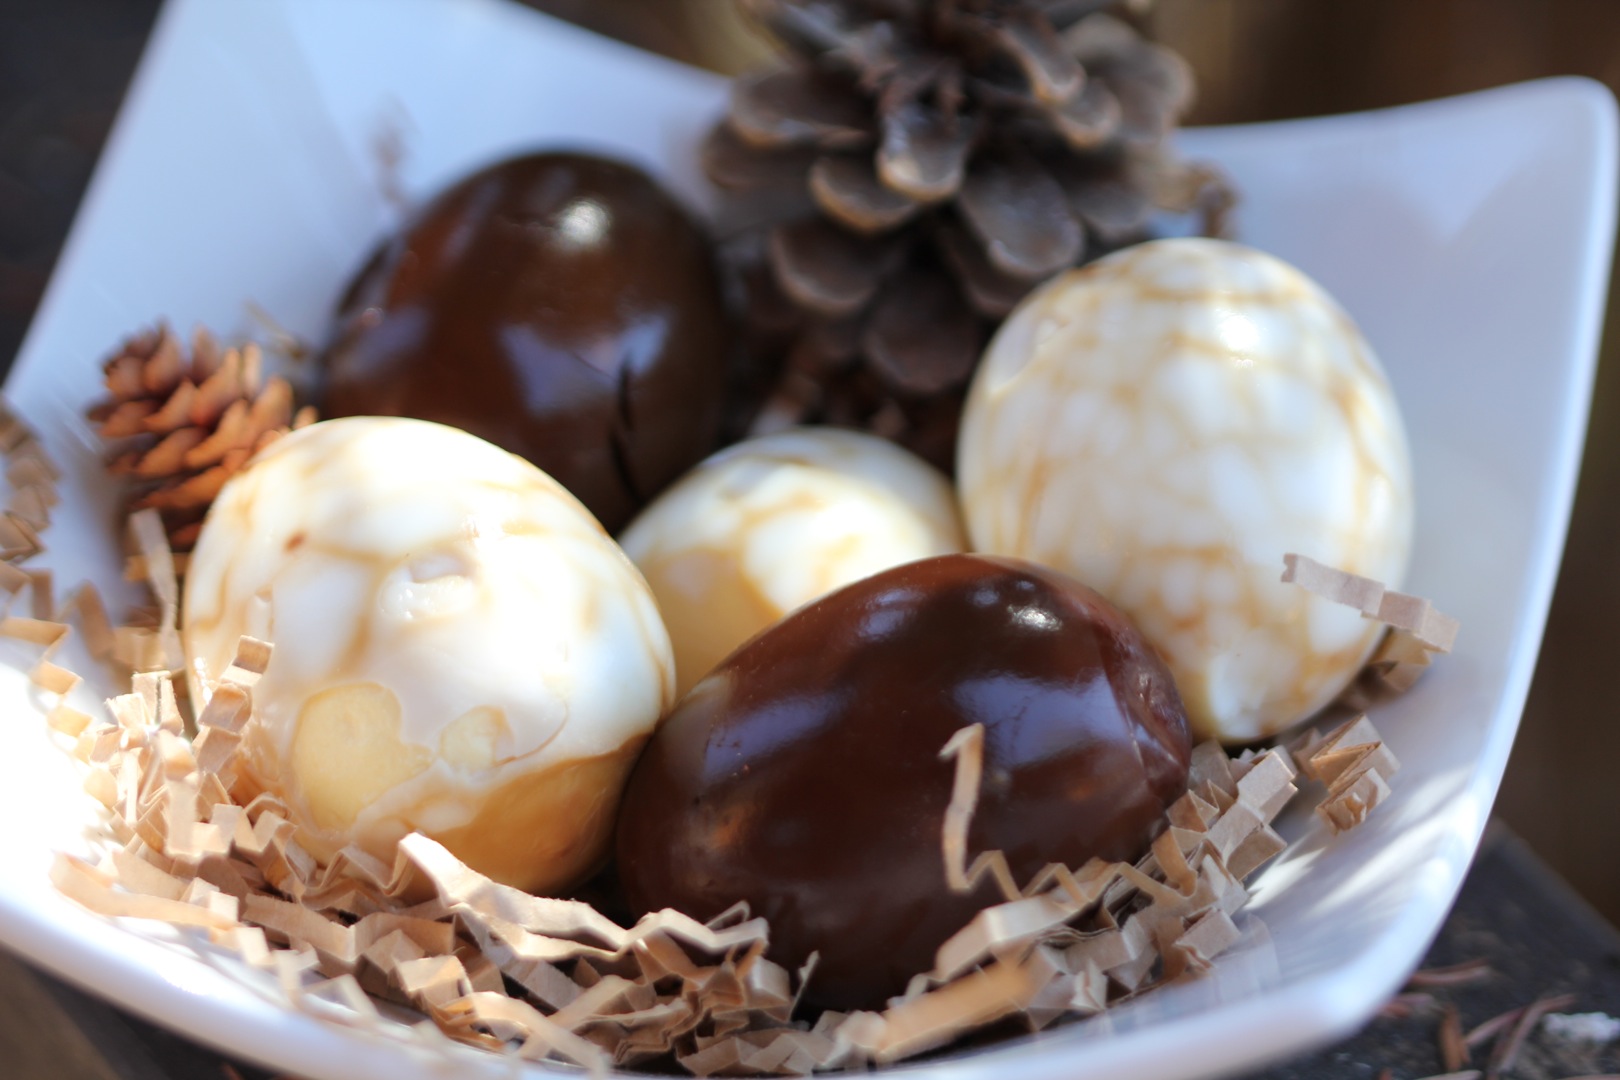
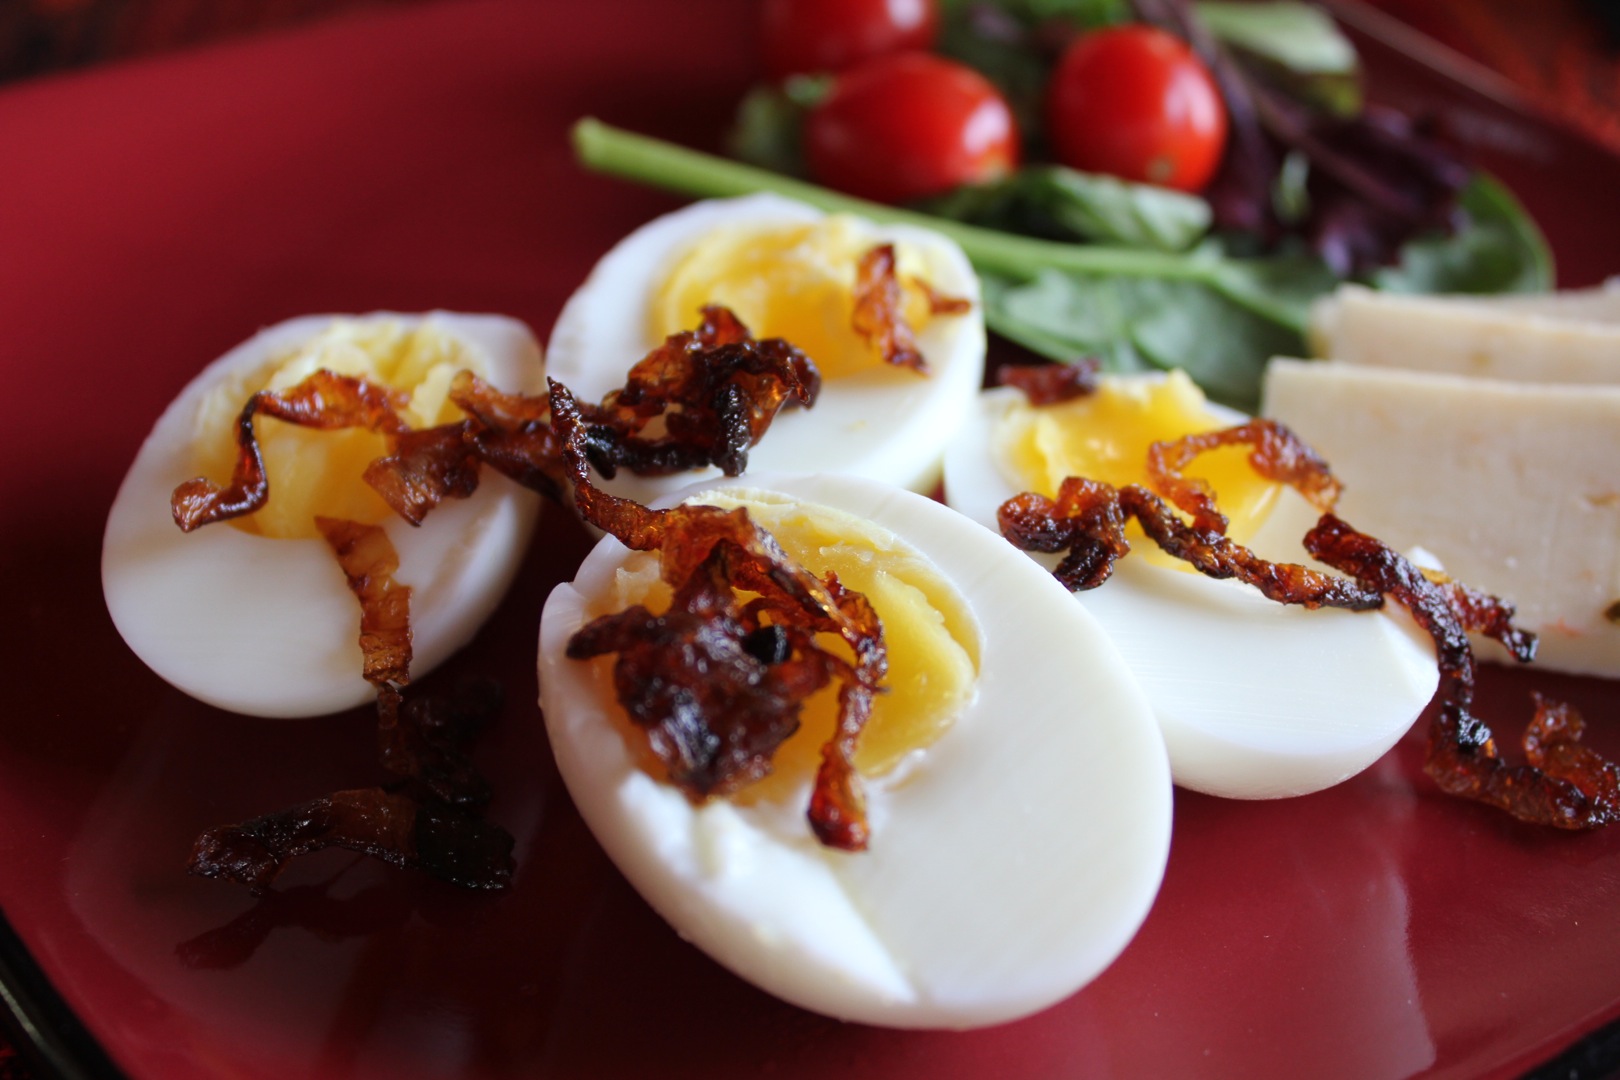
In the meantime, I recently decided to try pickling some eggs. Brian and his parents like pickled eggs, so I thought that if I made them at least someone would eat them. They were quick and easy to make and to my utter shock and surprise, I found that I loved pickled eggs. They are amazing on their own as a snack, chopped up in an egg or chicken salad, or sliced in half and served on a bed of greens. As I don’t like food that is too vinegary I eat them while they’re still mild, after just a few weeks of soaking in the brine.

I thought pickling eggs would be a great way of preserving our extra eggs for those long, dark months when our hens are laying less, however, jars of pickled eggs just don’t last very long in our house.

IMG_2035

I have been using Jean Pare’s recipes in her Company’s Coming: Preserves cookbook. She has both a traditional vinegar recipe as well as a sweeter version. I love them both. Try them and let me know what you think.


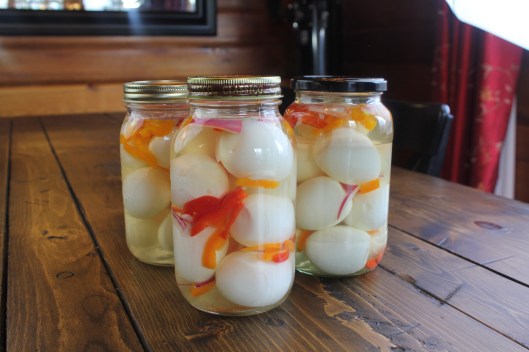
Pickled Peppers Eggs

12 large hard boiled eggs, shelled

1 each: yellow, red, and green pepper, seeded and cut into thin strips

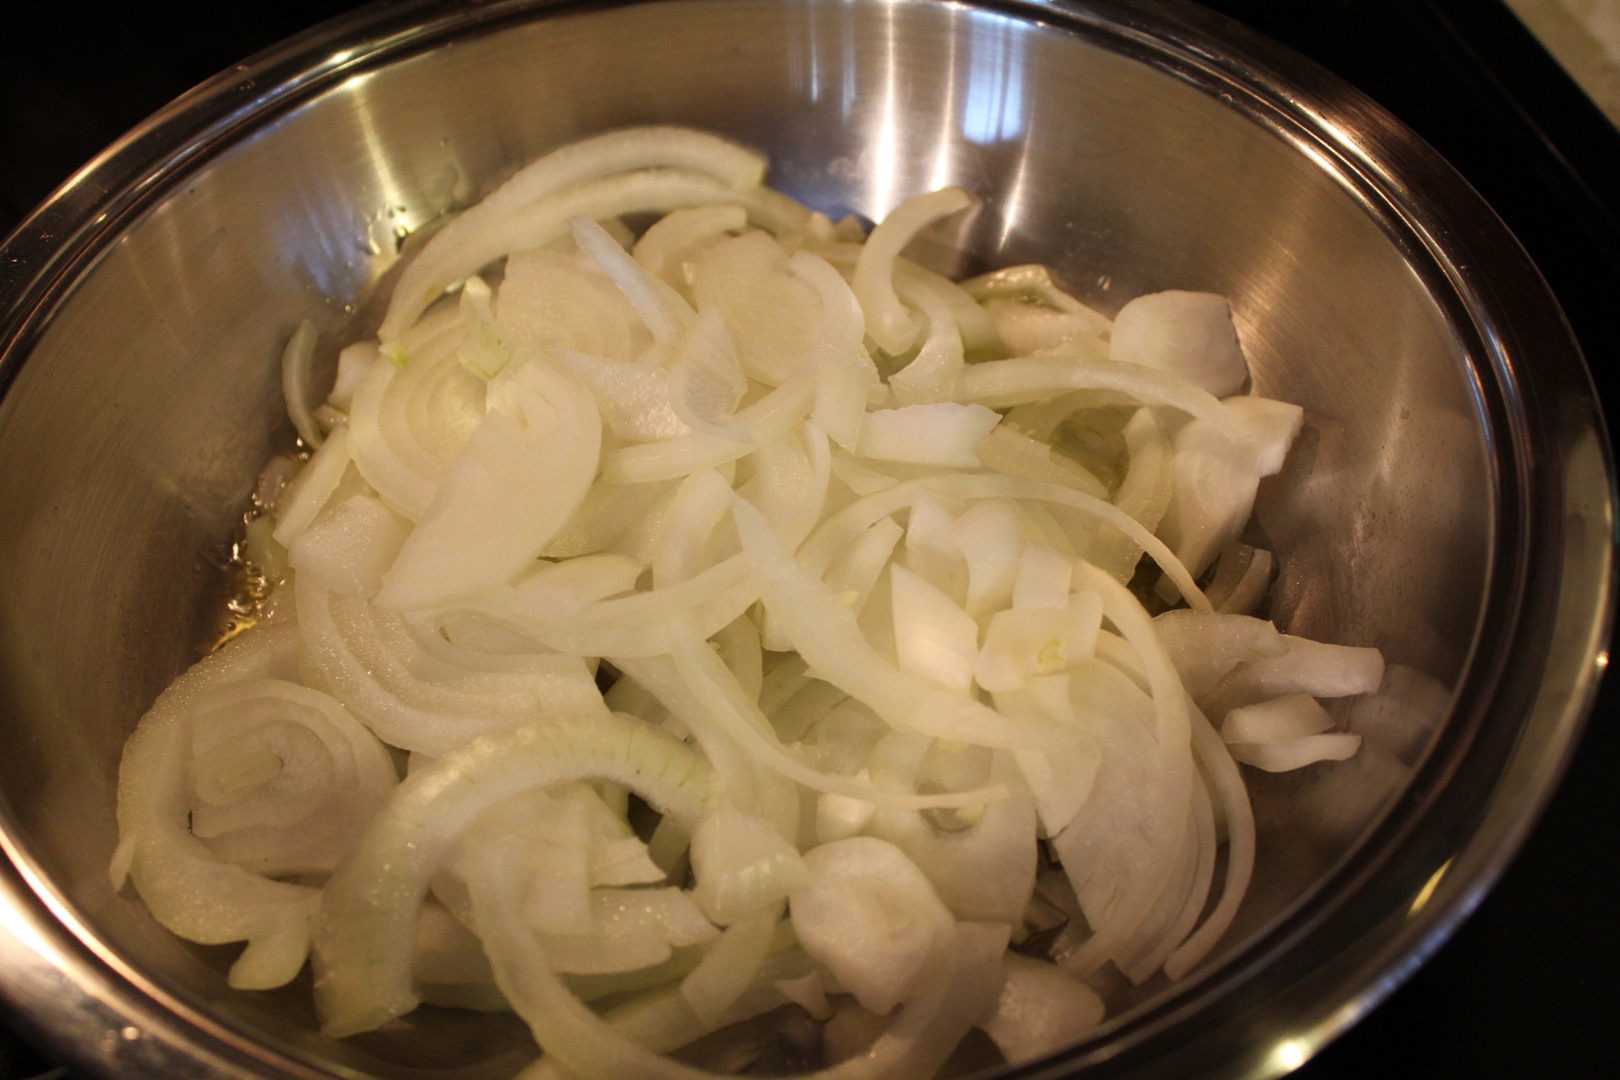
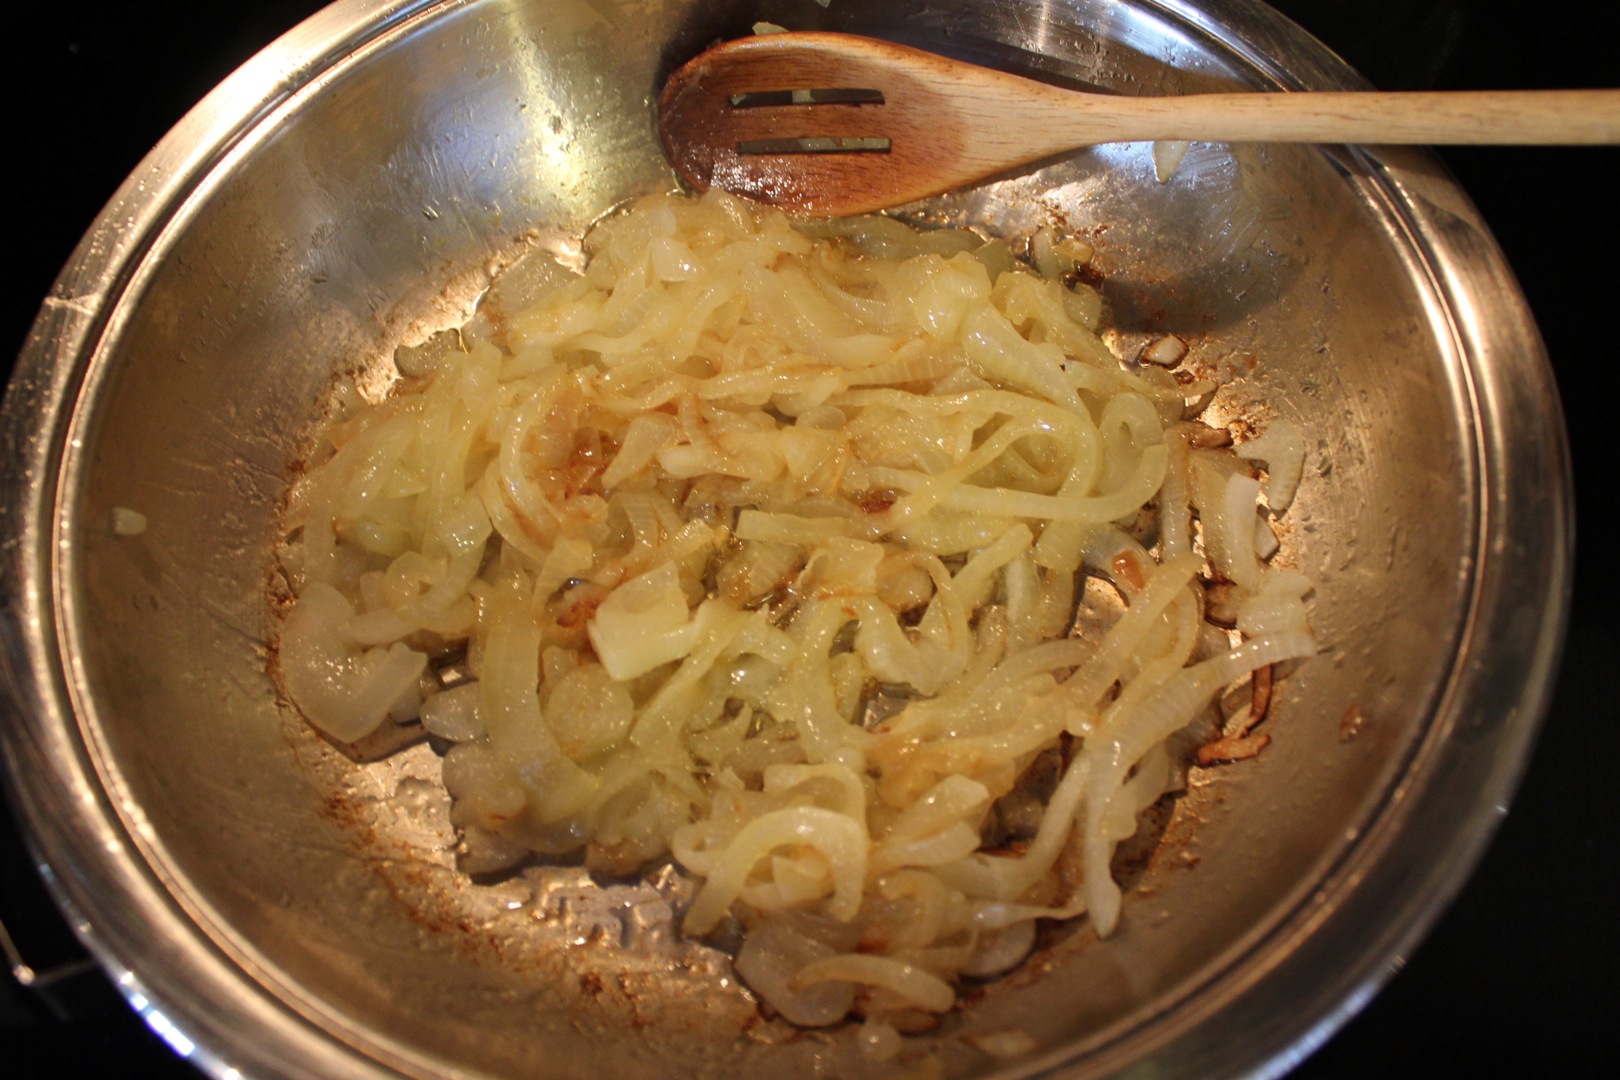
1 large onion (red, Spanish, or yellow), cut into half rings

BRINE:

2 cups white vinegar (I use white wine vinegar or pickling vinegar)

1 cup water

¼ cup granulated sugar

8-10 whole cloves tied in a piece of cheese cloth (or leave them loose and strain the vinegar as you pour it into your jars)

1 teaspoon sea salt

Arrange eggs a few at a time in a 2-quart jar. Place colored peppers and onions around them as you fill the jar.

Brine: In saucepan, bring all 5 ingredients to a boil over medium-high heat, stirring often. Boil for 5 minutes. Discard spice bag (or strain liquid). Pour over the eggs mixture. Brine must completely cover the eggs completely. Cover and store in refrigerator at least 4 days or more before eating. Keeps in refrigerator at least 6 months. Makes 2 quarts.

IMG_8385 (1)

Sweet Pickled Eggs

12 large hard boiled eggs

Cold water to cover

1 large onion, cut into half rings

BRINE:

2 cups white vinegar (I use white wine vinegar or pickling vinegar)

2 cups water

½ cup granulated sugar

1 teaspoon sea salt

1 tablespoon mixed pickling spice, tied in a piece of cheese cloth (or leave loose and strain when pouring into the jar)

Arrange eggs and onions in a 2-quart jar.

Brine: In saucepan, bring the first 4 ingredients to a boil over medium-high heat, stirring often until the sugar dissolves. Bring to a boil then remove from heat. Add pickling spice and swish the bag around for 30 seconds. Remove bag. Pour brine over the eggs mixture to within ¼ inch of the top. Seal. Brine must cover the eggs completely. Cover and store in refrigerator at least 1-2 weeks before eating. Makes 2 quarts.


Share this:

  • Twitter
  • Facebook
  • Pinterest
  • Print
  • Email

Like this:

Like Loading...

whole grain chocolate chippers

31 Saturday Jan 2015

Posted by Delena Rose in cook, cookies, whole grains

≈ Leave a comment

Tags

chocolate chip cookies, cookies, healthy cookies, spelt flour, sunflower seeds, whole grain

whole grain chipper

This recipe comes from my Chocolate Lover’s Cookies & Brownies cookbook. I’ve had this book for at least two decades and have only tried a few recipes in it so far. Now with the holiday season over, I needed a ‘healthier’ cookie to ease me through Christmas cookie withdrawal symptoms. Of course, eating five of these in one sitting doesn’t count as ‘healthy behaviour’ no matter how many raw seeds they contain!

whole grain chipper

Whole Grain Chippers

1 cup butter, softened

2/3 cup granulated sugar (I used raw cane sugar)

1 cup packed light brown sugar

2 eggs

1 teaspoon baking soda

1 teaspoon vanilla

pinch of salt

1 cup whole wheat flour (I used spelt flour)

1 cup all-purpose flour

2 cups uncooked rolled oats

1 package (12 ounces) semi-sweet chocolate chips

1 cup sunflower seeds (I used raw, untoasted seeds)

Preheat oven to 375 degrees. Lightly grease cookie sheets or line with parchment paper or silicone mat.

Cream butter with sugars and eggs in large bowl until light and fluffy. Beat in baking soda, vanilla and salt. Blend in flours and oats to make a stiff dough. Stir in chocolate chips. Shape rounded teaspoonfuls of dough into balls; roll in sunflower seeds.

Place 2 inches apart on cookie prepared sheets. Bake 8 to 10 minutes or until firm and golden brown on the bottom. Do not over bake. Cool a few minutes on cookie sheet then transfer to wire racks to cook completely. Enjoy!

One thing I like about ‘rolled in a ball cookie recipes’ is that you can refrigerate (or freeze) half the recipe and bake them a few days (or weeks) later. This is perfect for when you have a lot of baking to do all at once or as a stash in the freezer for unexpected company. I wold freeze the cookie dough balls on a sheet. Once frozen they could be put in a plastic container or large ziplock bag.

Resource:

Weber, L. (1990). Chocolate lovers cookies and brownies. Lincolnwood, IL: Publications International Ltd.

Share this:

  • Twitter
  • Facebook
  • Pinterest
  • Print
  • Email

Like this:

Like Loading...

kale & wild rice casserole

21 Wednesday Jan 2015

Posted by Delena Rose in cheese, cook, rice, vegetables

≈ Leave a comment

Tags

casserole, kale, mushrooms, vegetable, wild rice

kale and wild rice casserole

I found this recipe on Tieghan’s Half Baked Harvest – Made With Love food blog a few months ago and wanted to share it with you. I had a fresh block of gruyere cheese in the refrigerator and wanted to cook something that would warm the tummy on a cold, dark winter evening. This kale and wild rice casserole was perfect and I will definitely add Tieghan’s recipe to our list of family favourites.

Kale and Wild Rice Casserole

Ingredients

  • 2 large bunches of Kale, leaves torn
  • 1 pound cremini mushrooms, sliced
  • 2 tablespoons olive oil
  • 1 tablespoon butter
  • 2 cloves garlic, minced or grated
  • 2 tablespoons fresh thyme, chopped
  • 1/4 teaspoon nutmeg
  • 1/4 teaspoon salt
  • 1/2 teaspoon pepper
  • 4 tablespoons flour
  • 1 cup milk (I used 2%)
  • 1 cup chicken broth (or veggie broth)
  • 1/4 cup heavy cream or canned coconut milk
  • 4 cups cooked wild rice
  • 1 1/2 cup gruyere cheese, shredded
  • 2 tablespoons olive oil
  • 2 large sweet onions, sliced into thin rings
  • salt and pepper

kale and wild rice casserole

Instructions

Grease a 2-3 quart casserole dish. Set aside.

Heat a very large skillet (the largest you have!) over medium-high heat. Add all of the torn kale to the skillet and add 1 cup of water. Cover the skillet and cook for 10-15 minutes, stirring occasionally until the kale is wilted. Once the kale is wilted and all of the water has been absorbed, remove the kale from the skillet and set aside.

Return the skillet to medium heat and add 2 tablespoons olive oil. When the skillet is hot, sprinkle in the mushrooms in a single layer. Don’t stir them! Let them sizzle until they have caramelized on the bottom, about 2 minutes. When the bottoms are caramelized, toss them once and season with salt and pepper, to taste. Continue to cook without stirring for about 5 minutes. Now add the butter to the skillet and cook until the butter begins to brown. Once the butter is browned reduce the heat and add the garlic, thyme and nutmeg and cook for about 10 seconds. Now add the kale back to the skillet with the mushrooms, garlic and spices and toss well.

Sprinkle the flour over the kale and mushrooms and cook for 1 minute. Add the milk and chicken broth, bring to a boil and cook 2-3 minutes or until there is a thick sauce. Add the cream and stir to combine. Remove from the heat and stir in the cooked wild rice. Pour the mixture into the prepared casserole dish.

Preheat the oven to 375 degrees F.

Now wipe the skillet and add the olive oil, cook over medium-high heat. Add the onions and 1/4 teaspoon each salt and pepper. Cook, stirring constantly, until the onions begin to soften, about 5 minutes.Continue to cook until the onions are golden brown, about 20 minutes.

Sprinkle half the cheese over the casserole and then add the onions and the remaining cheese. Bake the casserole for 20-25 minutes or until the cheese is melted and the onions are crispy. Serve!

  • Cook time: 40 minutes
  • Total time: 50 minutes

Resource:

Half Baked Harvest – Made With Love food blog

kale and wild rice casserole

Share this:

  • Twitter
  • Facebook
  • Pinterest
  • Print
  • Email

Like this:

Like Loading...

pumpkin bread

08 Saturday Nov 2014

Posted by Delena Rose in breads, cook

≈ Leave a comment

Tags

pumpkin, pureed pumpkin

pumpkin bread

It’s pumpkin season and this recipe is a moist and flavorful way to enjoy your freshly roasted pumpkin puree. I tried this recipe for the first time today and love how the bread turned out. This recipe is actually a variation of the zucchini bread recipe that I use from my 40th Anniversary Edition Betty Crocker Cookbook.


Pumpkin Bread

2 cups pumpkin puree (or 1 -16 oz can)

1-2/3 cups sugar

2/3 cup vegetable oil

2 teaspoons vanilla

4 eggs

3 cups all-purpose or whole wheat flour (I used spelt flour)

2 teaspoons baking soda

1 teaspoon salt

1 teaspoons ground cinnamon

½ teaspoon ground cloves

½ teaspoon baking powder

½ cup coarsely chopped nuts

½ cup raisons, if desired

Heat oven to 350 degrees. Grease the bottoms of 2 loaf pans (I line mine with parchment paper as well).Mix pumpkin, sugar, oil, vanilla and eggs n a large bowl. Stir in remaining ingredients. Pour into pans. Bake 50 to 60 minutes or until wooden toothpick inserted into the center comes out clean. Cool for 10 minutes. Loosen the sides of the loaves; remove from pans. Cool completely before slicing. Wrap tightly and store at room temperature up to 4 days, or refrigerate up to 10 days. Enjoy!

pumpkin bread

Share this:

  • Twitter
  • Facebook
  • Pinterest
  • Print
  • Email

Like this:

Like Loading...

Easter eggs… cabinorganic style

19 Saturday Apr 2014

Posted by Delena Rose in Chinese, cook, Easter

≈ Leave a comment

Tags

Easter, Easter eggs, eggs, marbleized eggs, soy sauce, soy sauce chicken, soy sauce eggs

soy sauce eggsOur son, Chayton, is just going on nine months and so I didn’t feel the need to decorate fancy eggs or prepare many Easter treats. In fact, at his play group Easter party last Tuesday, Chayton was more interested in the paper bag holding his treats than the actual treats (and yes, he ate a few pieces of the bag!) However, I still needed something special for us to enjoy Easter morning. After all, it is Chayton’s first Easter. So I decided to make soy sauce eggs.

These are simple to make and taste wonderful. Usually, you make the soy sauce chicken marinade and cook your chicken in it first. Then you throw in a few hard boiled eggs (shelled) to soak up the sauce. At that point the sauce is diluted with juices from the chicken and so you have to marinate the eggs for a few hours to get dark, salty eggs. I found that I didn’t have to soak these eggs very long at all before the eggs got real dark- almost chocolate brown. To get solid dark eggs, peel all of the shell. For the marble look, crack the shell all over and soak them in the marinade with the shell still on. Marinate for half an hour or until your desired color. If you’ve cooked chicken in the marinade first, marinate for an hour or two.

soy sauce eggs

Soy Sauce Chicken & Eggs

I recommend using one-quarter of this marinade if you’re only making soy sauce eggs.

4 cups mushroom soy sauce

3 cups water

1 cup dry white wine

1/2 cup sugar

5 thin slices fresh ginger

4 star anise

3-pound whole broiler-fryer chicken

spring onion

parsley

Heat soy sauce, water, wine, sugar, ginger root and star anise to boiling in Dutch oven. Add the chicken; heat to boiling. Reduce heat to medium-low.; cover and simmer 30 minutes or until done, turning the chicken and stirring the mixture 2 or 3 times.

Remove chicken from soy sauce mixture; let chicken stand for 20 minutes. Chop chicken with cleaver into 2 -1 inch pieces. Arrange pieces on serving platter in the shape of a chicken and garnish with spring onions and/or parsley.

Once sauce has cooled a bit, place hard boiled eggs (shelled) in the mixture and allow to marinade until desired intensity. Enjoy!

Resource:

Tlusty, L. (1981). Betty Crocker’s New Chinese Cookbook. New York,NY: Prentice Hall General Reference.


Share this:

  • Twitter
  • Facebook
  • Pinterest
  • Print
  • Email

Like this:

Like Loading...

black bean brownies

07 Monday Apr 2014

Posted by Delena Rose in cakes and brownies, cook, gluten-free, sweets, wheat-free

≈ 4 Comments

Tags

adzuki beans, black bean brownies, black beans, brownies

black bean brownies

These are everything a brownie should be: moist, ‘fudgy’ and full of flavor! There is no flour in this recipe, which makes them both wheat-free and gluten-free and you can’t even taste the beans as they hide in among the chocolate chips. I’ve used both black beans and adzuki beans, which I soak over night and then cook up in a slow cooker here at home. My young friends gobble these up and I have to admit,  these don’t last long here at our home!

Black Bean Brownies

2 cups black beans or adzuki beans (canned or freshly cooked at home)

2 eggs

3 tablespoons canola oil

1/3 cup cocoa powder

1/2 teaspoon salt

1 teaspoon vanilla

3/4 cup raw cane sugar (or natural sweetener of your choice)

1 teaspoon instant coffee

1/2 cup semi-sweet chocolate chips (I use 1 cup to make this extra ‘chocolate-y’)

Preheat oven to 375 degrees F.

Blend all ingredients, except the chocolate chips, together in a mixer or blender. Stir on the chocolate chips. Transfer to a greased 8 x 8 baking pan (I also line it with parchment paper). Bake for 30 minutes and allow brownies to cool before serving. Enjoy!

black bean brownies

Share this:

  • Twitter
  • Facebook
  • Pinterest
  • Print
  • Email

Like this:

Like Loading...

potato and pea curry

04 Friday Apr 2014

Posted by Delena Rose in cook, curry, Indian

≈ Leave a comment

Tags

curry, pea, potato, potato pea curry, vegetarian

potato and pea curry

A very simple and quick curry for every day. I served this on a bed of coconut rice and garnished it with caramelized onions.

Potato and Pea Curry

4 large potatoes, peeled and cut into 1-inch cubes

2 teaspoons brown mustard seeds

2 tablespoons ghee or canola oil

2 onions, sliced

2 closed garlic, crushed

2 teaspoons ginger, grated

1 teaspoons turmeric

salt and pepper

1/2 teaspoon chili powder

1 teaspoon ground cumin

1 teaspoon garam masala

1/2 cup water

2/3 cup frozen or fresh peas

2 tablespoons fresh mint, chopped

Heat the mustard seeds in a large dry pan until they start popping. Add the ghee (or oil), onions, garlic, ginger and cook, stirring, until soft. Add the turmeric, salt, pepper, chili powder, cumin garam masala and potatoes. Stir until coated.

Add the water and simmer, covered, for 15-20 minutes, or until potatoes are just tender. Add the peas and stir; simmer, covered for 3-5 minutes, or until the potatoes are cooked and the liquid is absorbed. Stir in the mint and serve hot or warm. Enjoy!

Resource:

Stephen, W. & al. (1996). The Essential Vegetarian Cookbook. NSW, Australia: Murdoch Books.

potato and pea curry

Share this:

  • Twitter
  • Facebook
  • Pinterest
  • Print
  • Email

Like this:

Like Loading...

carrots and rutabagas with lemon and honey

27 Thursday Mar 2014

Posted by Delena Rose in cook

≈ 2 Comments

Tags

carrot, root vegetable, rutabaga, turnip

carrots and rutabagas

My family never ate turnips, rutabagas or parsnips when I was growing up so I never discovered how delicious they are until my adult years. I have only just tasted rutabaga this past week and have my fellow gardener, Rabbit (from Winnie the Pooh) to thank for finding this recipe! My son, Chayton enjoys watching Winnie the Pooh and we have watched the episode: “Rabbit and the Rutabaga Wrangler” more than a few times! I kept wondering what a rutabaga was and finally asked Brian, who explained it was a root vegetable, similar to a turnip. He brought one home the following weekend and I hunted for a recipe to cook it with. I found this one on the Epicurious website and loved how it turned out. For those who dislike turnips or rutabagas, this dish may surprise you. Where traditional pureed rutabagas are heavier and filling- a wonderful accompaniment to a winter feast, this recipe is light, a bit crunchy and lemony- perfect for lunch on the patio on a summer day.

Carrots and Rutabagas with Lemon and Honey

1 rutabagas, peeled, cut into matchstick-size strips
6-8 carrots, peeled, cut into matchstick-size strips
1/4 cup (1/2 stick) butter or extra virgin olive oil (I used olive oil)
1/4 cup fresh lemon juice
3 tablespoons honey
1 teaspoon grated lemon peel
1/2 cup chopped fresh chives

Cook rutabagas in large pot of boiling salted water 2 minutes. Add carrots and cook until vegetables are cooked through but still slightly firm, about 5 minutes.  (Or cook longer for more tender vegetables.) Drain.

Melt butter (or olive oil) in large pot over medium-high heat. Add lemon juice, honey, and peel. Bring to boil. Add vegetables; stir until glazed and remove from heat. Or, for softer vegetables, cook for about 6 minutes, stirring occasionally. Season to taste with salt and pepper. Remove from heat. Mix in fresh chives. Serve immediately and enjoy!

Rutabaga is cross between a member of the cabbage family and the turnip family. It was a staple during World War II when food was scarce which is why it is often thought of as a ‘deprivation food’. Rutabagas are more pungent than turnips and the pungency can be reduced by blanching the vegetable in boiling water for 5 minutes before cooking. Rutabagas are an excellent source of potassium and a good source of vitamin C. It also contains magnesium, folic acid and phosphorus.

carrots and rutabagas1Resource:

Fortin, J. (1996). The Visual Food Encyclopedia. Montreal, Quebec: Les Editions Quebec/Amerique Inc.

Share this:

  • Twitter
  • Facebook
  • Pinterest
  • Print
  • Email

Like this:

Like Loading...

pizza with a new twist- try a flavorful cauliflower crust

13 Thursday Mar 2014

Posted by Delena Rose in cook

≈ Leave a comment

Tags

all vegetable pizza, cauliflower, cauliflower pizza crust, gluten-free pizza, pizza, wheat-free pizza

doughless pizza

I made this pizza for the first time a few weeks ago and it was so delicious that I had to make it again the following weekend! If you are gluten-free or wheat-free this pizza is perfect for you. For the rest of us, this is another delicious variation of an old favorite. The nice thing about this pizza recipe is that you don’t feel all full and doughy after eating it. You actually feel ‘light’. This recipe comes from William Davis’s Wheat Belly book.

doughless pizza

Wheat-Free Pizza

1 head cauliflower, cut into 1-to-2 inch pieces

About 3/4 cup of olive oil

2 large eggs

3 cups mozzarella cheese, shredded

Your choice of meat toppings: sausage, pepperoni, ground beef, turkey or pork

12 ounces pizza sauce or 2 cans to tomato paste

Your choice of vegetable toppings: peppers, sun-dried tomatoes, chopped onions, garlic, fresh spinach, mushrooms, olives, etc.

Fresh or dried basil

Fresh or dried oregano

black pepper

1/4 cup Parmesan cheese, grated

Preheat the oven to 350*F. Lightly coat a pizza pan or large rimmed baking sheet with 1 tablespoon of olive oil. (I use parchment paper here.)

In a large pot of boiling water or in a vegetable steamer, cook the cauliflower until soft, about 20 minutes. Drain and transfer to a large bowl. Mash until the cauliflower is the consistency of mashed potatoes. Add 1/4 cup of the oil, the eggs and 1 cup of the mozzarella cheese. Mix well.

Pour the cauliflower mixture into the pizza pan and press the “dough” into a flat, pizza-like shape no more than 1/2 inch thick (I made mine thinner, about 1/4 inch thick.) Bake for 20 minutes.

If using ground meat, cook in a skillet until browned and cooked through.

Remove the pizza “crust” from the oven and spread it with pizza sauce or tomato paste, the remaining 2 cups of mozzarella cheese, vegetable and meat toppings, basil, oregano and pepper. Drizzle with the remaining 1/2 cup olive oil (I used less, about 1/4 cup) and sprinkle with the Parmesan cheese. Bake until the mozza melts, about 10- 15 minutes.

Cut the pizza into wedges and use a spatula to transfer to plates. Enjoy!

Note: the “dough” will look like real pizza dough but will be too soft to handle with your hands. You will have to use a knife and fork to eat it and you’ll have to be careful when transferring pieces to plates.

doughless pizza

Resource:

Davis, W. (2011) Wheat Belly: Lose the Wheat, Lose the Weight and Find your Path back to Health. New York, NY: Rodale.

doughless pizza

Share this:

  • Twitter
  • Facebook
  • Pinterest
  • Print
  • Email

Like this:

Like Loading...

add some sweetness to your savory dishes with caramelized onions

12 Wednesday Feb 2014

Posted by Delena Rose in cook

≈ 2 Comments

Tags

caramelized, caramelized onions, onion dish, onions

caramelized onion

Caramelized onions are so easy to make and they only require three ingredients: onions, a bit of olive oil and time.

caramelized onion Start by thinly slicing your onions- use a red or a yellow onion. I like to make a larger batch with about four onions, which fit into my pan nicely.

caramelized onion

Heat two tablespoons of the olive oil (for four onions) in a pan on medium heat. Add the onions and cook uncovered, stiring frequently until the onions are translucent. At this point turn the heat down to medium low and continue to slowly cook, stirring frequently. At this point the natural sugars in the onion will begin to caramelize, turning the onions a deep brown color. Watch the onions carefully so that they do not burn. As they onions darken I turn down the heat even more and allow them to cook until they are dark brown and ‘dry’ looking. Overall this takes about 45 minutes to an hour. I like to caramelize onions when I know that I’ll be in the kitchen doing something else for a while. That way I am in no rush.  Caramelized onions are a great example of ‘slow food’ and they are well worth the time.

caramelized onion

caramelized onion

caramelized onion

Serve over poached eggs, with pasta, roast vegetables, on any meat dish, over pizza, or with any mushroom dish.

caramelized onion

Store the caramelized onions in a sealed container in the fridge. Enjoy!

Share this:

  • Twitter
  • Facebook
  • Pinterest
  • Print
  • Email

Like this:

Like Loading...
← Older posts

Shop our Online Store

cabinorganic logo

Visit our Youtube Channels

Visit our other blogs

Delena Rose

Enter your email address to follow this blog and receive notifications of new posts by email.

RSS Links

RSS Feed RSS - Posts

RSS Feed RSS - Comments

categories

  • Alberta Mycological Society (1)
  • appreciate the seasons (48)
    • Autumn (3)
    • Easter (1)
    • Halloween (1)
    • winter fun (1)
  • art (3)
    • book making (1)
    • pottery (1)
  • babe and child (1)
  • barn (1)
  • be mindful (4)
  • bellybabechild (5)
  • birds (3)
  • butterflies (1)
  • buy local (13)
  • cabin living (26)
  • Chayton (4)
  • chickens (7)
  • chocolate-making (1)
  • cook (156)
    • ancient grains (3)
    • breads (4)
    • breakfast (1)
    • cakes and brownies (1)
    • cheese (3)
    • Chinese (1)
    • cookies (2)
    • curry (2)
    • gluten-free (2)
    • Jamaican (1)
    • Mexican (2)
    • muffins (2)
    • oil & vinegar (1)
    • pastry (1)
    • preserve (17)
    • rice (1)
    • salads (1)
    • vegetables (1)
    • wheat-free (2)
    • whole grains (21)
  • Devonian Botanical Garden (2)
  • DIY (1)
  • drum (2)
  • eco-living (6)
  • explore (5)
  • family (2)
  • for the body (2)
    • Wizard Lake Soap & Body (1)
  • forage (25)
  • garden (20)
    • bird butterfly bee (1)
    • greenhouse (1)
    • herb & tea (1)
    • medicine wheel (2)
  • handmade (24)
    • bent wood furniture (1)
    • books (1)
    • labels (1)
  • healing (3)
  • Indian (1)
  • Indigenous teachings (1)
  • juice (3)
  • kids (1)
  • lake living (4)
  • local events (2)
  • Lucy (10)
  • make it (14)
    • knit (3)
  • mindfulness (4)
  • more about us (9)
  • Mother's Day (1)
  • mushrooms & fungi (3)
  • Native flute (1)
  • online store (1)
  • photography (1)
  • Pigeon Lake (17)
  • play (4)
  • raw foods (2)
  • read (6)
  • refinish (4)
  • reflections (3)
  • repurpose (7)
  • restaurants (1)
  • restore (10)
  • reuse (5)
    • thrift store finds (1)
  • seeds and nuts (1)
  • sweets (3)
  • tea (9)
    • Dragonfly Lane Teas (1)
  • thrift store finds (1)
  • Uncategorized (1)
  • wild berries (21)
  • wild flowers (6)
  • wild life (2)
  • wild mushrooms (2)
  • wild plant (2)
  • wild women (5)
  • Winter Solstice (1)
  • Worms (1)
  • write (3)

archives

  • May 2022 (1)
  • March 2022 (1)
  • January 2022 (3)
  • December 2021 (2)
  • June 2018 (1)
  • January 2018 (3)
  • December 2017 (4)
  • April 2015 (1)
  • January 2015 (3)
  • November 2014 (3)
  • July 2014 (1)
  • April 2014 (4)
  • March 2014 (3)
  • February 2014 (2)
  • January 2014 (2)
  • December 2013 (1)
  • November 2013 (5)
  • October 2013 (4)
  • September 2013 (10)
  • August 2013 (4)
  • May 2013 (1)
  • April 2013 (2)
  • March 2013 (5)
  • February 2013 (3)
  • January 2013 (5)
  • December 2012 (5)
  • November 2012 (5)
  • October 2012 (6)
  • September 2012 (8)
  • August 2012 (6)
  • July 2012 (8)
  • June 2012 (9)
  • May 2012 (19)
  • April 2012 (18)
  • March 2012 (15)
  • February 2012 (17)
  • January 2012 (19)
  • December 2011 (20)
  • November 2011 (18)
  • October 2011 (17)
  • September 2011 (22)
  • August 2011 (27)
  • July 2011 (9)

food for thought

“Eat food. Not too much. Mostly plants.” ~Michael Pollan

Blogroll

  • Alberta Lamb Producers
  • Alberta Mycological Society
  • Alberta Plant Watch
  • Arctic Chalet
  • Aroma Borealis
  • Baking Beauties
  • Becoming Minimalist
  • Blue Heron Artists and Artisans
  • blue roof cabin
  • Bulk Herb Store
  • Cedar Spirit Flutes
  • Chris Martenson
  • Daily Health Boost
  • delightfullysimple
  • Devonian Botanical Garden
  • ECOcafe
  • Elm Cafe
  • Etsy
  • Gold Forest Farms
  • Grainworks
  • Happy Wrap
  • Learn WordPress.com
  • Michael Pollan
  • Mindsprings
  • Mother Earth News
  • Mountain Rose Herbs
  • My Repurposed Life
  • Noorish
  • Northern Alberta Society for Animal Protection
  • Pigeon Lake Nordic Ski Club
  • Pigeon Lake Provincial Park
  • Rundle Mission
  • Sage Mountain Herbal Retreat Center
  • TED
  • The Spirit Books
  • The Story of Stuff
  • The Village at Pigeon Lake

ECOcafe

Blog Stats

  • 316,372 hits

  • Follow Following
    • cabinorganic
    • Join 154 other followers
    • Already have a WordPress.com account? Log in now.
    • cabinorganic
    • Customize
    • Follow Following
    • Sign up
    • Log in
    • Report this content
    • View site in Reader
    • Manage subscriptions
    • Collapse this bar
 

Loading Comments...
 

    %d bloggers like this: