• about us
  • Books
  • Merchandise

cabinorganic

~ For people who are passionate about respecting the earth, walking in nature, observing wildlife, local diet, making do, repurposing, organic gardening, foraging for wild plants and fungi, natural health, scrumptious healthy cooking, renovations, DIY, crafting, raising children simply and mindfully, taking time for stillness, and living in harmony with the seasons.

cabinorganic

Category Archives: garden

more details on building the raised beds in the Medicine Wheel garden

03 Thursday Jul 2014

Posted by Delena Rose in garden, medicine wheel

≈ 1 Comment

Tags

garden, garden boxes, Medicine Wheel garden, raised beds, vegetable garden

raised beds

I must apologize for the long delay in getting this post up, especially to the four readers who wrote in early spring asking for more details on building the raised beds in the Medicine Wheel garden. My eleven-month old son is finally taking longer naps -and I am also now able to stay up past his bedtime- so I can now get back to one of my favorite things: blogging and sharing my life with each of you.

In this post, I will go into more detail on how we got the dimensions for the raised bed boxes for those who are interested in building their own. Click here if you need to refresh your memory on the previous post that we did two summers ago on building the raised beds. If you would like your raised bed circle to be smaller or larger you can use what we did here as a guide and plug in your own measurements. On the other hand, if my dimensions suit you just fine, then skip to the end where I will just give you the basic details in a nutshell. Please note that later this summer (or early next spring), we plan to build the second row in the Medicine Wheel garden so this is a work in progress! The next boxes will be a bit shorter and wider and we will be sure to include the dimensions for that when we do it.

How We Calculated the Dimensions for the Boxes:

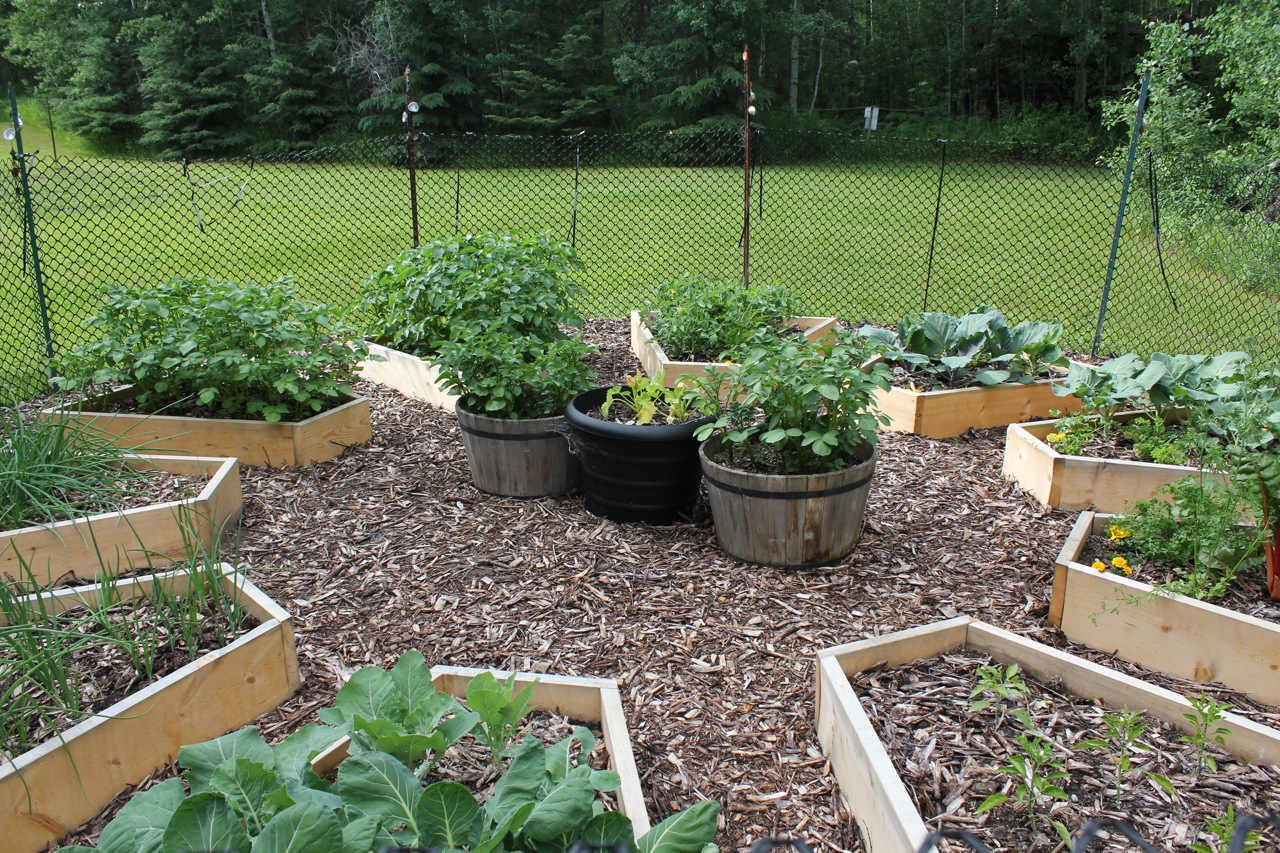
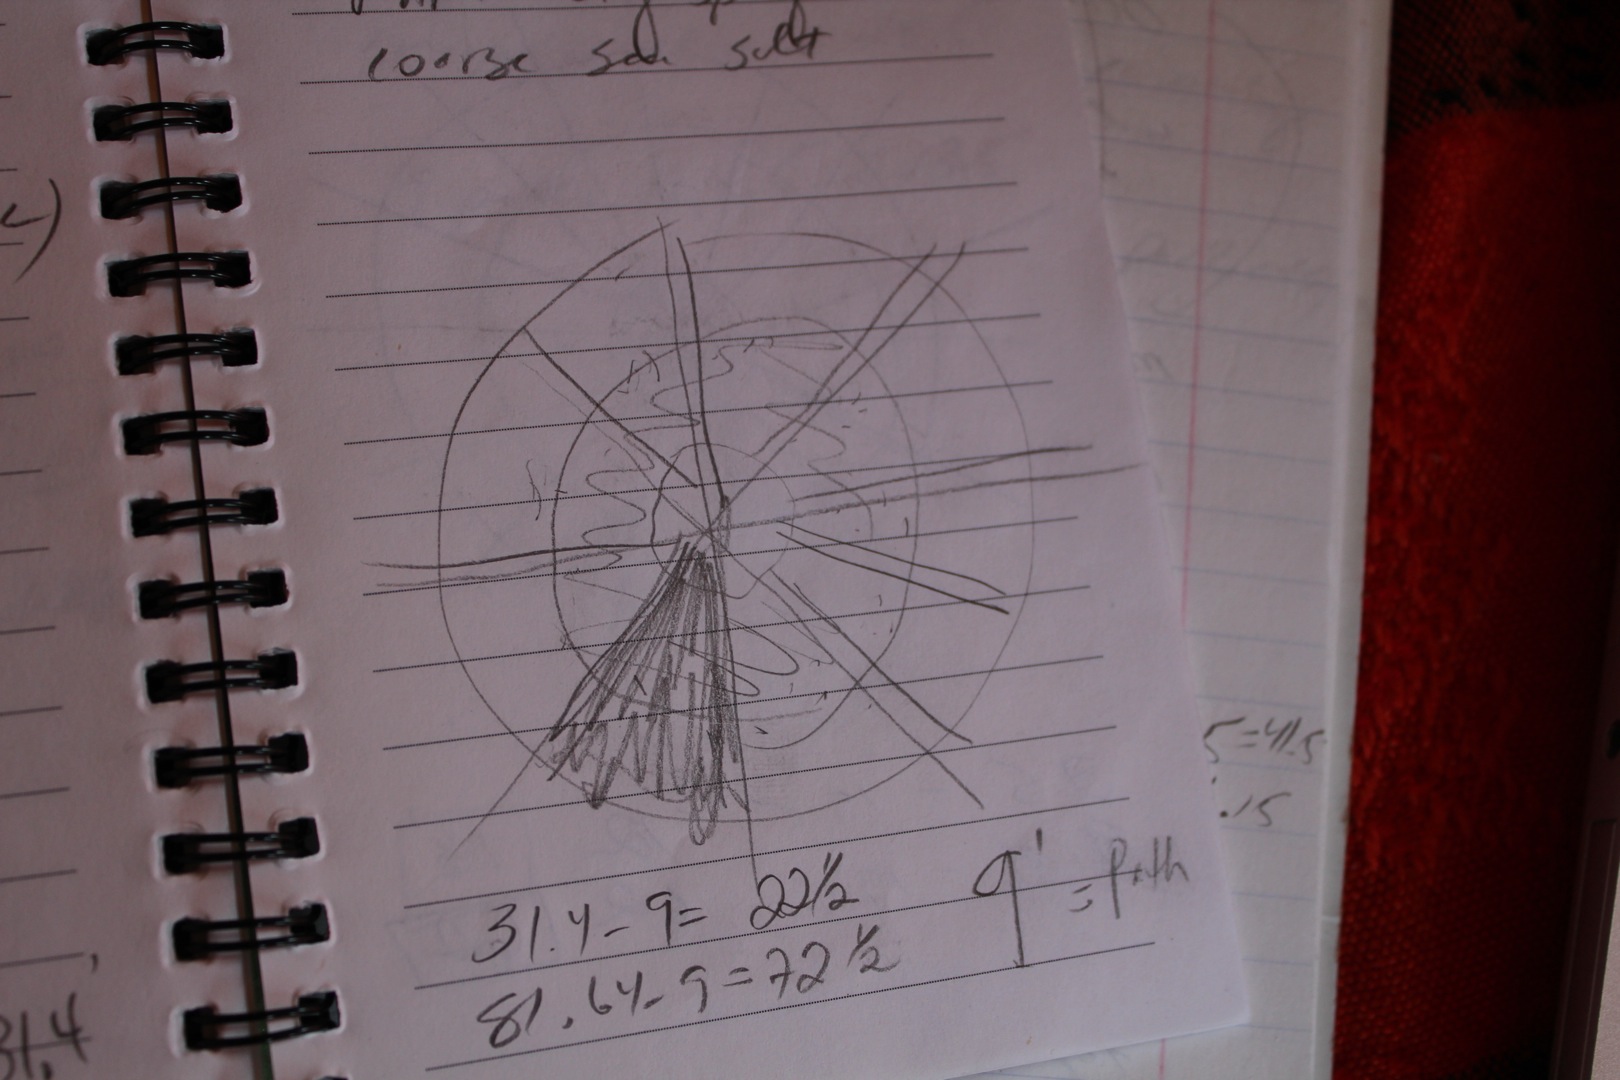
There was a bit of math involved in getting the dimensions for the layout of the beds. I started with some rough sketches of what I envisioned. As you can see, it looks like a pie. All I needed to do was figure out how large of a pie it should be, how much space I wanted in the center, and decide how wide I wanted the walkways to be in between each bed.

drawing

I started from the center and decided that I wanted a 10 foot diameter for the center circle. From there I knew I wanted the row of beds to be 4 feet long. I also knew that I wanted the walkways to be about a foot and a half wide, or 18 inches.

drawing

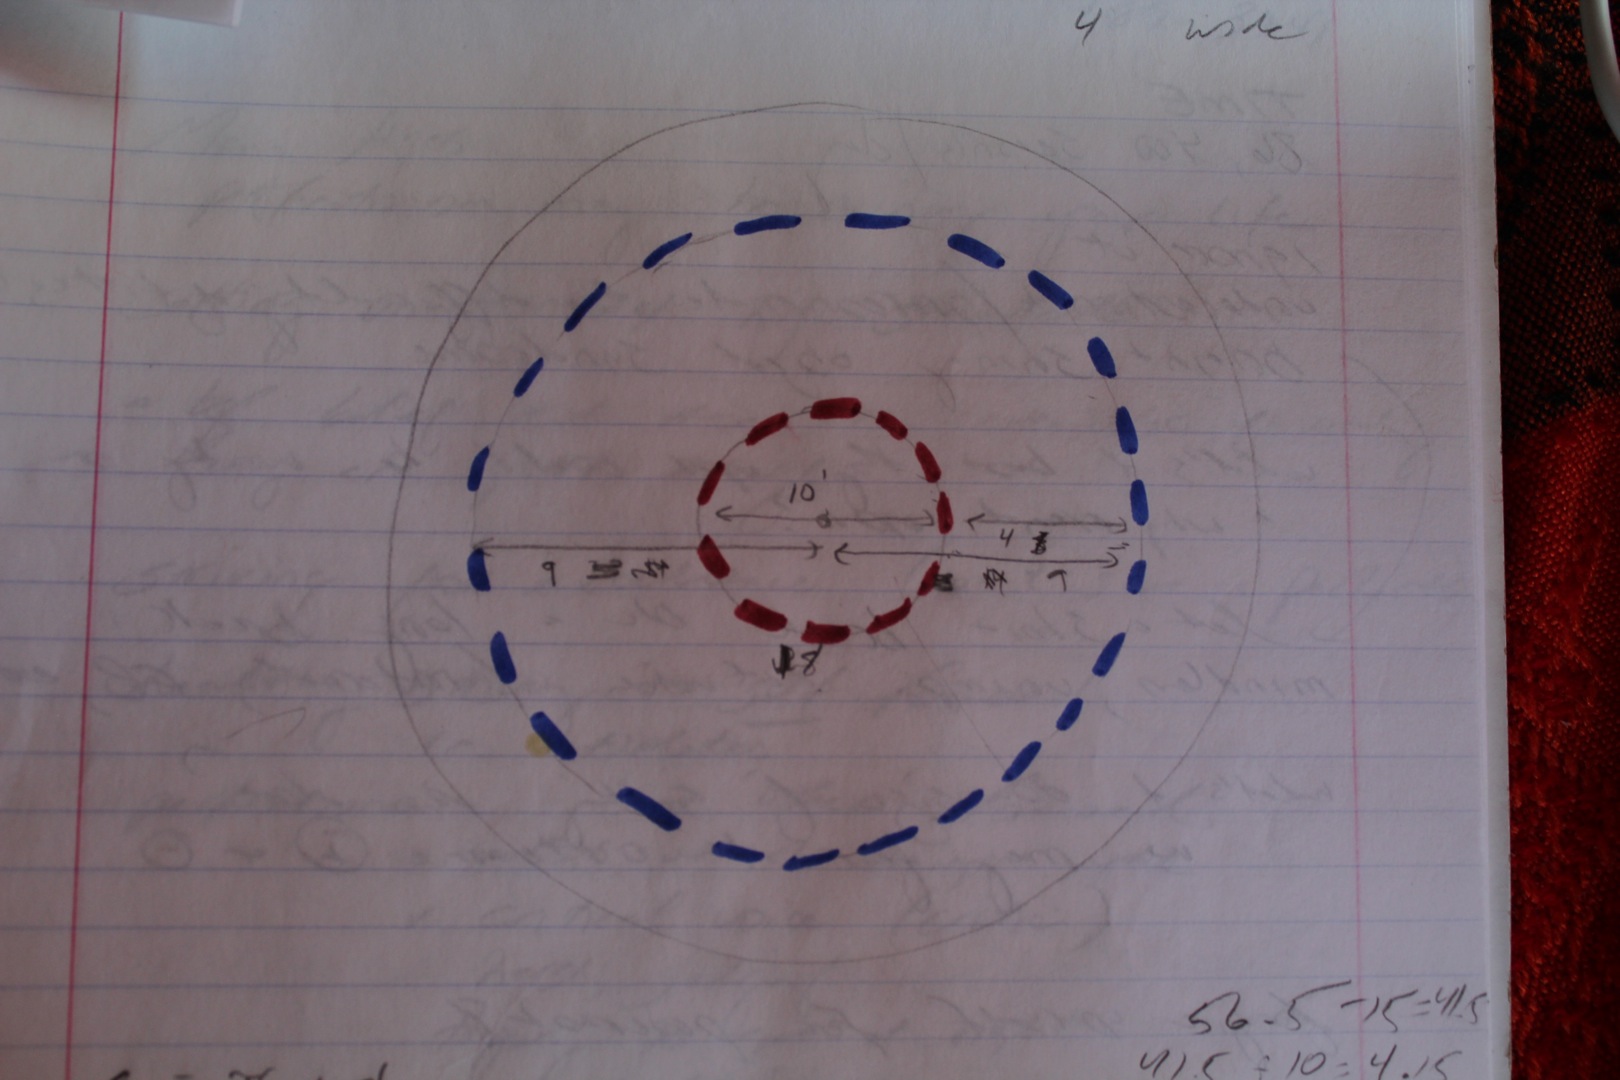
To get the dimensions for the beds, I calculated the circumference of both the center circle and the outer circle. The inner circle gives me the length of wood to cut for the narrow end. I simply subtracted the total amount of space needed for the walkways between each bed and divided what was left by the number of beds I wanted to have.

circumference = pie (3.14) x diameter


center circle: c = 3.14 x 10 = 31.4 or 31 ½ feet

outer circle: c = 3.14 x 18 = 56.52 or 56 ½ feet

I wanted 10 paths at 1 ½ feet wide: 10 x 1.5 = 15 feet in total

Center circle: 31 ½ – 15 = 16.5 feet (left for the narrow end of the beds)

16.5 divided by 10 beds = 1.65 or about 1 ½ feet for the narrow end

outer circle: 56 ½ – 15 = 41.5 feet (left for the wider end of the beds)

41.5 divided by 10 beds = 4 feet for the wider end

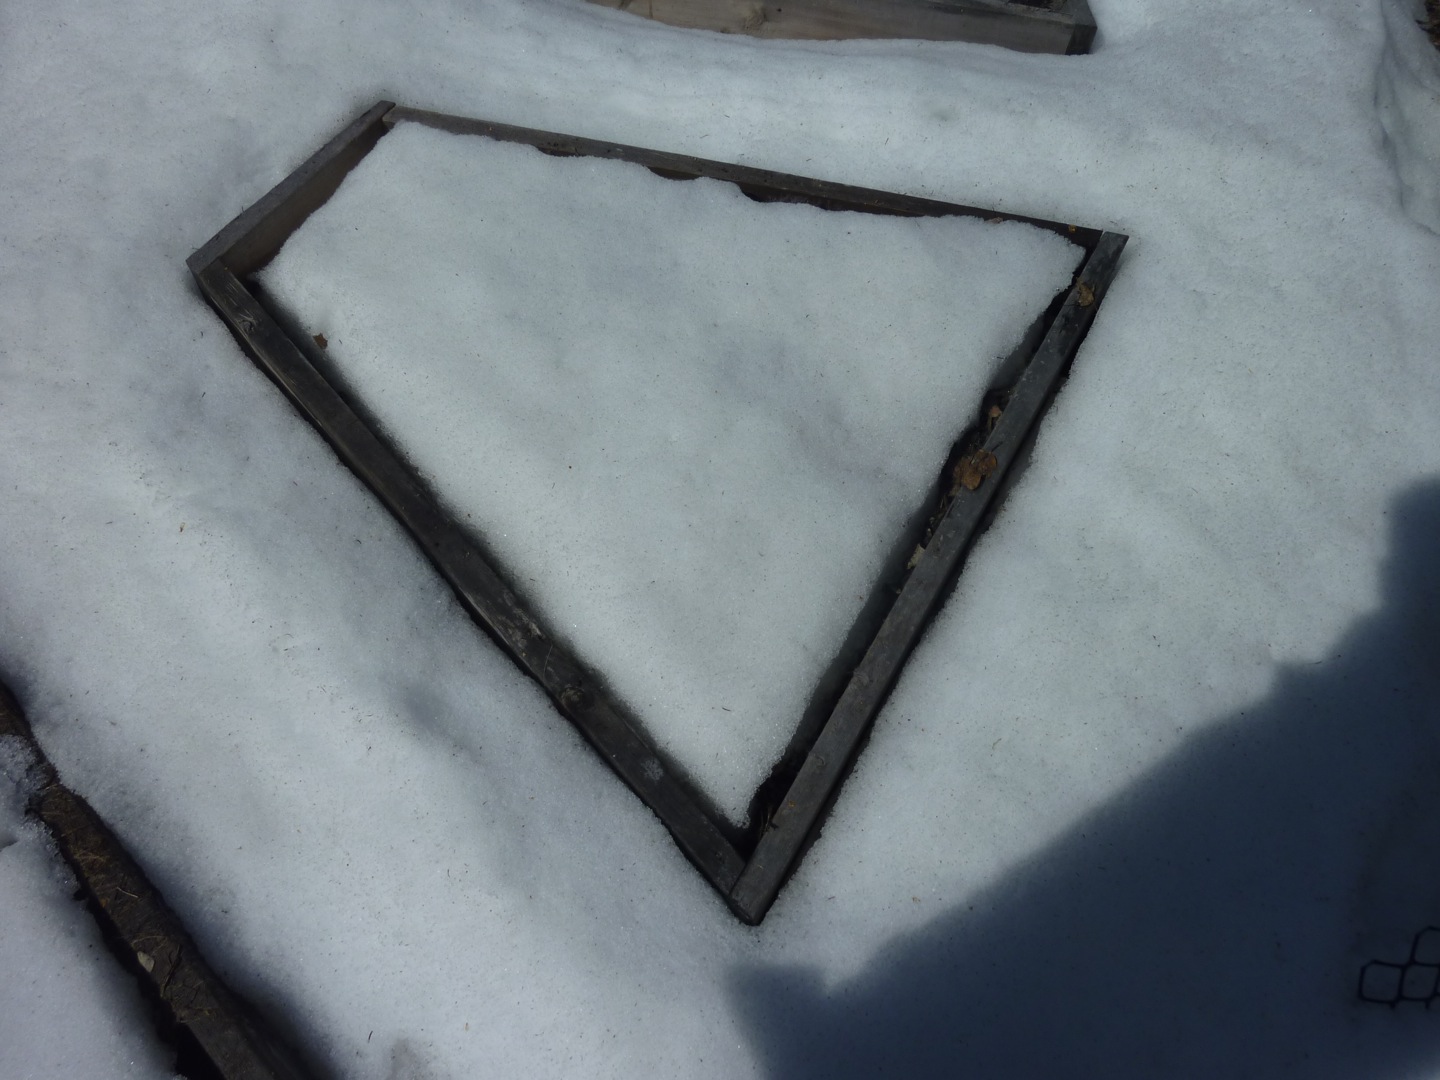
Then it was time to cut the wood and get building. We bought 2 x 10 untreated spruce. I chose untreated wood because I did not want any chemicals leaching into my garden soil and into our food. We cut the lengths for each bed: 10 pieces at 1-½ feet (narrow end) 10 pieces at 4 feet (wider end) and 20 more pieces at 4 feet (sides of the boxes)

Cutting the ends on an angle gives the boxes a finished look with no gaps in the corners. Brian is an engineer and did some quick calculations to get the angle: 36 degrees. You could also just use a sliding bevel. Lay your pieces out and use the sliding bevel to record the angle. Then take the sliding bevel to your miter saw and adjust the tilt of your blade to match the angle. Click here to see what a sliding bevel is and how to use one. The magical thing is that all of your cuts will be at the same angle so you only need to adjust your miter saw once. See the picture below: the narrow and wider ends are the longer pieces and the side pieces fit inside. This is the tricky part where you really don’t want to be in a rush: make sure you are cutting you angle in the right direction. I made quite a few mistakes before Brian came and took over so my boxes are actually a bit shorter than planned! It’s worked out all right in the end because we just made sure all of the boxes were the same size.

raisedbeds

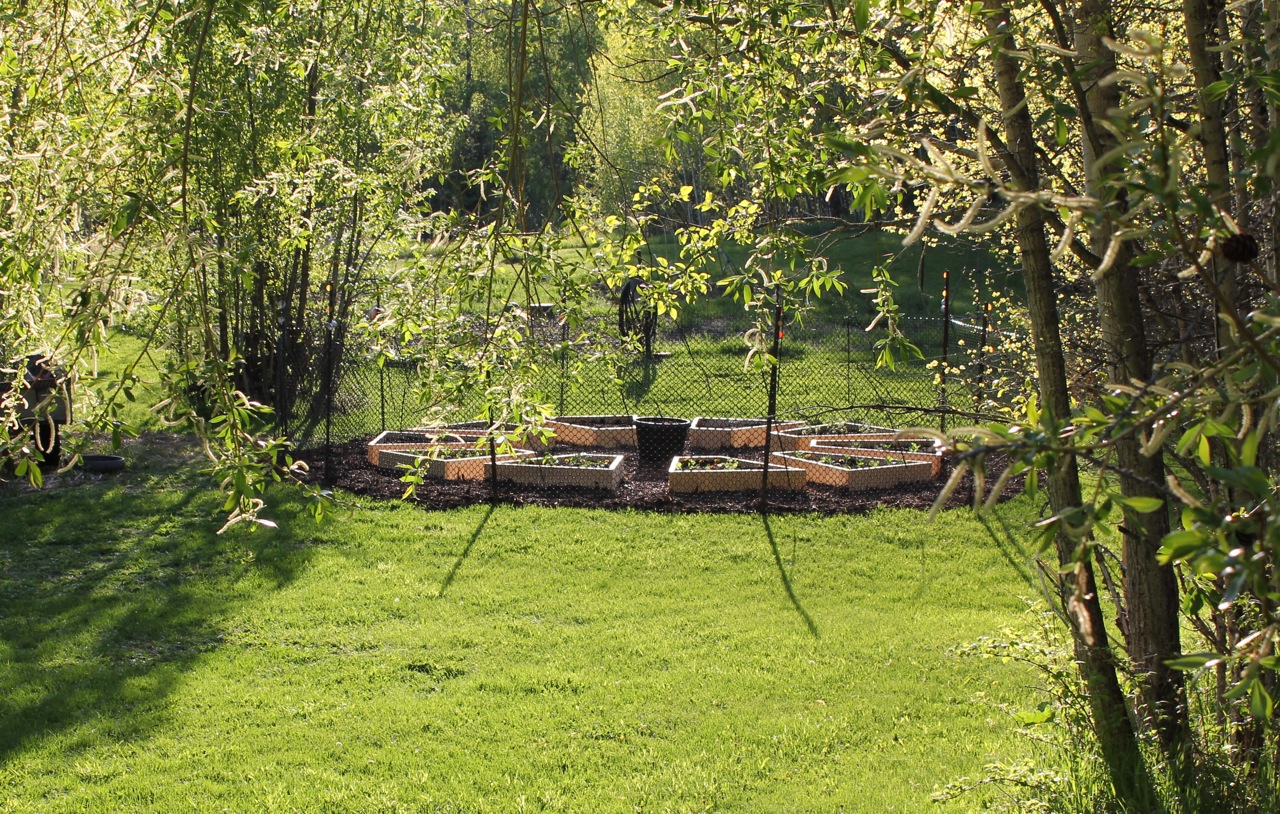
Once the pieces were cut, Brian screwed them together with deck screws. Then using the 10 feet center circle as our guide, we arranged the boxes in a circle, making sure that we had about 1-1/2 feet between each box for the walkways. This was not exact but once everything was in place it all looked beautiful.

raised beds

In a Nutshell:

Use 2 x 10 spruce

Cut 10 pieces at 1-½ feet (narrow end)

Cut 10 pieces at 4 feet (wider end)

Cut 20 more pieces at 4 feet (sides of the boxes)

Arrange a box on the ground and use a sliding bevel to record your angle for cutting the ends.

Transfer this angle to your miter saw and cut your ends so that they will fit nicely together.

In the center point of your garden space, measure a small circle with a ten-foot diameter.

Place your boxes around this circle with a 1-1/2 foot space in between. raised beds   
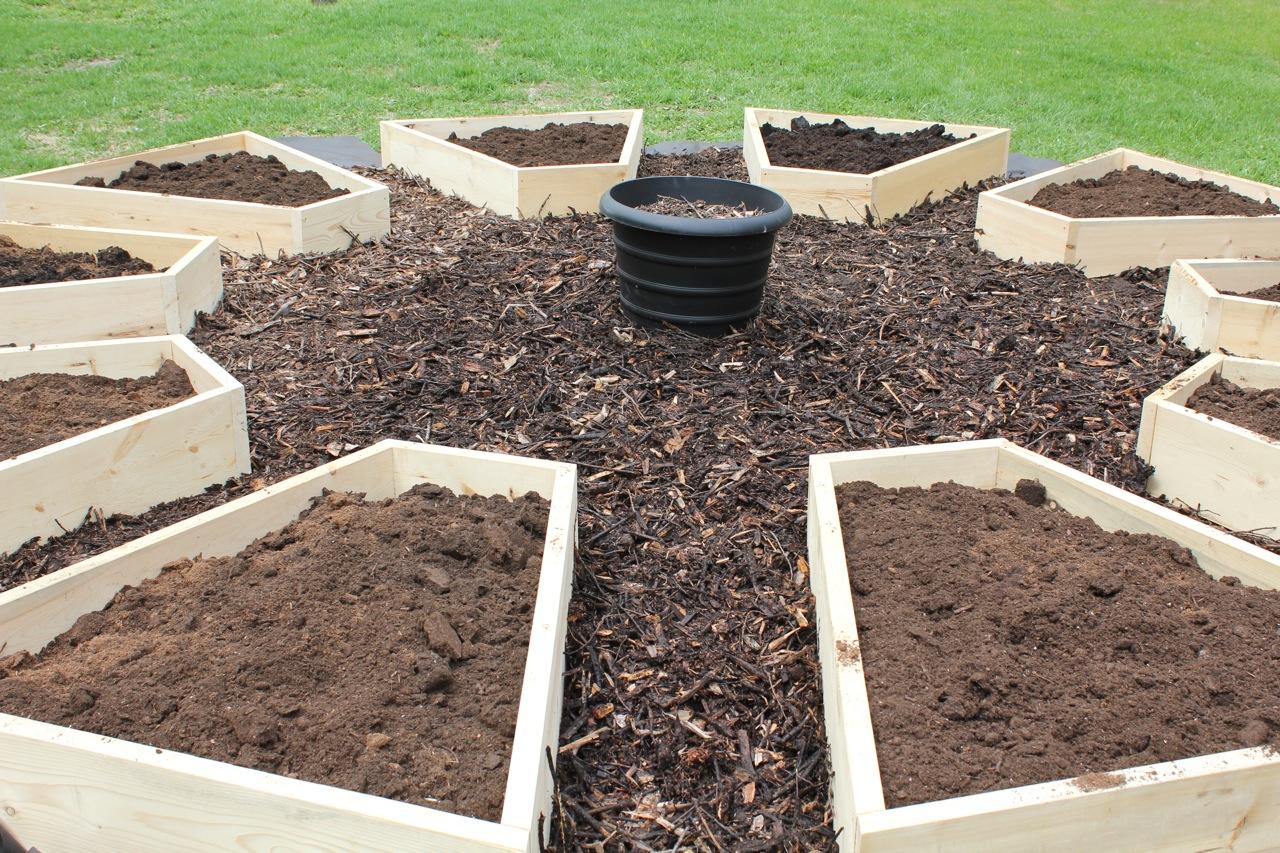
I hope this helps! I would love to hear how your own raised beds turn out!    

Share this:

  • Twitter
  • Facebook
  • Pinterest
  • Print
  • Email

Like this:

Like Loading...

starting seeds with Chayton

12 Wednesday Mar 2014

Posted by Delena Rose in bellybabechild, garden

≈ 1 Comment

Tags

children gardening, garden, heirloom seeds, kids gardening, seeds, sprouts, starting seeds, tomato seeds

starting seeds

Last year I wasn’t too ambitious in the garden as I knew I would be in my third trimester of my pregnancy in the summer and did not want to be working too long in the hot sun with a big belly and then have a huge harvest to manage right when baby arrived.

plant2With spring just around the corner, Brian and I are really looking forward to getting back to our outdoor projects. These include: restoring our old well pit (which is attached to the basement and will be used as a cold room for root vegetables), landscaping a large fire pit area, putting in a raspberry and strawberry patch, restaining a wooden jungle gym (given to us by Erin and Mitch who used to play on it when they were little. It’s still in great shape!) and beginning phase one of landscaping the “Bird, Butterfly and Bee Garden”, which will do double duty as Chayton’s play area while he is still little. If we get a burst of energy we just may set up our chicken coop and get that going as well.

seeds

In preparation, Chayton and I started some seeds about three weeks ago.

seeds1 seeds

We planted three varieties of heirloom tomatoes, yellow and green zucchini, spaghetti squash, both long and pickling cucumbers,  basil, parley, chives, black-eyed susans and echinacea (purple cone flower). As always, it’s so exciting to see the seeds sprout and watch them grow.

Chayton

It’s even more exciting planting with Chayton as this is his first year helping mom in the garden. I hope that our simple lifestyle will instill in Chayton an appreciation of good food, nature, fresh air, sunshine as well as the fun of growing things yourself!

We plan on planting more seeds this coming week and are looking forward to a new season in the garden!

cucumber sprout

Share this:

  • Twitter
  • Facebook
  • Pinterest
  • Print
  • Email

Like this:

Like Loading...

the herb and tea garden gets a planter box and a new look

04 Tuesday Sep 2012

Posted by Delena Rose in cabin living, garden, restore, reuse

≈ 1 Comment

Tags

deck, garden, herb and tea garden, peppermint, peppermint tea, planter, planter box, stain, stain deck, trellis


Do you remember this restoration project from last spring? Below is the extreme ‘before’ shot of this little promising patch of garden in the front yard taken last May. I spent a week lovingly moving stones, enriching the soil and planting a variety of perennial herbs and teas.

Here is another view of the ‘before’ stage. Please note the old, weathered stain on the deck and pay particular attention to the open area where the top of the garden meets the deck…Here is an ‘after’ shot taken last May. I had the garden all finished and planted but notice the deck and the open space at the top of the garden still needed to be addressed. Also, notice how the color of the old stain seems to blend in and downplay the beautiful deck…

This past summer as I was making my way around the huge deck with my paintbrush and can of stain, B asked me what I was planning on doing with this big, empty, unproductive space? I told him that I’d eventually like to build a planter box there for mint. While I continued staining, he instantly began working on it…
B leveled the soil and then built this beautiful planter box mainly out of scraps and repurposed wood from the shed.

Once the planter box was finished he decided to take it a step further and address the empty space under the deck with some of the left over trellis from the patio project…

I love how clean this area looks now and notice the that by this time I had caught up with staining the deck in this area.

Here is another angle. The dark stain on the deck rails is a really nice contrast to the wood grain of the cabin. Instead of blending in it pops right out and frames the view quite nicely. Next year, I’d like to add a few large bright red clay pots in a variety of sizes to the concrete area for a splash of color.

Once again, here is another ‘after’ shot. As I write this, the planter is now bursting with peppermint that is waiting to be harvested and dried for peppermint tea. What was once a neglected, uninspiring spot in the garden is now productive and beautiful and adds to the ‘curb appeal’ of the cabin. The best part is that the new additions look as though they have always been there!

Stay tuned to see a neglected corner of deck turned into what I like to call, my restful Zen deck…

Share this:

  • Twitter
  • Facebook
  • Pinterest
  • Print
  • Email

Like this:

Like Loading...

checking in on the raised bed garden…

17 Tuesday Jul 2012

Posted by Delena Rose in garden

≈ 9 Comments

Tags

brussels sprouts, garden, kale, leeks, Medicien Wheel garden, onions, raised bed garden, raised beds, red cabbage, Swiss chard

The last time I posted on the raised bed garden was back in May after it was just built. It was so exciting to see my vision of a circular Medicine Wheel raised bed garden come true! Next summer I will add a second row of triangular boxes and begin incorporating elements of the Medicine Wheel.

Back in May it looked like this: (click here to see the post)

I planted potatoes, peppers, a variety of onions, leeks and garlic, broccoli, brussels sprouts, kale, Swiss chard, red and green cabbage, kohl rabbi, tomatoes and a number of herbs.

A week and a half ago, the garden looked like this:

Brussels sprouts…


Leeks, onions and garlic…Red cabbage…

These raised beds have been very little work so far this season. I haven’t had to water yet as we have been receiving plenty of rain. I have only weeded a few times and there were only a few small weeds to pull. My main job so far has been keeping the slugs off of the brassicas. I have been picking them off by hand and then sprinkling diatomacious earth on the plants (which dehydrates and kills the slugs as they travel over it). This works very well until the rain washes it off and I have to reapply. Tonight I will sprinkle some woods ash around the plants and then put out a few half-filled trays of beer (the slugs apparently drown themselves in it while heartily singing pub songs). I will also put out small aluminum tart trays with a slice of cucumber in it (apparently the slugs hate the smell of the chemical reaction between the aluminum and the cucumber which drives them to drink the beer conveniently located nearby). I’ll let you know whether I am successful this year. Last year by mid-summer I had a lovely row of green cabbage one day and just the naked spines of the plants after a week of rain (and my neglect). This year I would like to enjoy the brassicas myself, thank you very much!


Share this:

  • Twitter
  • Facebook
  • Pinterest
  • Print
  • Email

Like this:

Like Loading...

June blossoms and blooms

10 Sunday Jun 2012

Posted by Delena Rose in garden

≈ Leave a comment

Tags

apple blossoms, blooms, blossoms, columbine, hawthorn blossoms, lilacs, tulips

I thought I’d capture a few of June’s blossoms and blooms and share them with you! Above are the lilacs…

The next two are apple blossoms…

As you can imagine, the bees and butterflies are busy visiting the trees and shrubs!

Here is some columbine below…

…and Hawthorn blossoms from the tree outside my dining room window. The berries and small apples will attract many different kinds of birds in the fall and winter and keeps the resident squirrel happy and fed!

I still have a few tulips blooming and adding beauty to the garden…

Share this:

  • Twitter
  • Facebook
  • Pinterest
  • Print
  • Email

Like this:

Like Loading...

E tends to her garden

07 Thursday Jun 2012

Posted by Delena Rose in garden

≈ Leave a comment

Tags

barrel pots, carrots, container gardening, E's garden, garden, peas, potatoes, trellis, vegetables

E came over last weekend to take a peek at her new garden and to see if anything needed to be tended to. She was delighted to see that all five pots were full of little sprouts from the seeds she had planted just two weeks earlier.

First, she noticed that her labels were fading in the sun and decided to improve them using masking tape and a new permanent marker (see picture below).

As peas love to climb, E decided to build a little trellis for them. I had some extra bamboo stakes in the greenhouse and some garden twine. I gave them to E and let her decide how she would design the trellis. I simply held the stakes wherever she wanted them and she did the weaving to hold it all together.

The end product looks like a work of art and we can’t wait to see the peas climb up the stakes…!

Next, we found a few neglected barrel pots and moved them into the Medicine Wheel garden. We filled them with good soil and E planted red potatoes in one and Yukon gold potatoes in the other. It doesn’t look like much now, but soon these pots will be bursting with baby potatoes for her family dinners… sent home with some garlic and chives of course!!!

The best thing about helping E grow her first garden is that I get to experience those ‘firsts’ all over again. Together, we can work together, learn together and watch her garden grown into something edible and delicious!

Share this:

  • Twitter
  • Facebook
  • Pinterest
  • Print
  • Email

Like this:

Like Loading...

raised beds in the Medicine Wheel garden

26 Saturday May 2012

Posted by Delena Rose in garden

≈ 24 Comments

Tags

circular garden, garden, Medicine Wheel, Medicine Wheel garden, organic garden, raised beds, round garden, sacred garden

This was a very exciting weekend for me as I was able to finish the next phase of the Medicine Wheel garden. If you recall, last summer my neighbor simply rotatilled a small area and I created the garden straight into the ground using mulch to mark the pattern and paths. Click here to see last year’s Medicine Wheel garden.

This year, I had the time and budget to create the first row of raised beds. I used 2″x10″x8′ untreated spruce lumber. (As this is an organic garden I avoided pressure treated lumber as it is impregnated with chemicals.) I pre-cut the wood and later B came over and helped me cut out the angles and assemble the boxes.
I had some extra chicken wire laying around so I tacked a piece under each box to keep the pocket gophers from stealing my root vegetables.

Then we arranged the boxes into a circle. You can see the location of last year’s garden in the background. I like the new location as it is closer to the cabin and is close to the water supply.

We laid newspaper and landscaping cloth in the paths and middle section to keep the weeds out, and filled each box with a mixture of dried leaves, sand, compost, peat and topsoil. I will be adding casings from my vermiculture (worm bin) later to boost the soil even more.

Then we spread mulch over the landscaping cloth. This was where we stopped last weekend.

Yesterday evening, I got to work disassembling the fence around the old garden and moving the fence posts to the new location. It was a treat to see a Pileated woodpecker working on a tree nearby and then fly right over me. I call them the ‘punk rockers’ of the wood pecker family.

Then early this morning, Lucy and I awoke to a large coyote checking out the new garden! I let her out to chase it away. Later, after our morning walk and breakfast, I added a final round of newspaper and landscaping cloth around the outer edge of the wheel and covered all of the cloth with more mulch. Then I wrapped the fencing around the posts and secured it with wire. I left a few extra feet to wrap around the end as a makeshift gate. I didn’t get too fancy with the fence as it will be dismantled and rebuilt again next spring in order to make room for the second row of raised beds.

I planted the potatoes (red and Yukon gold), onions (red, white, yellow and shallots) and garlic. The fun part was transplanted all of the plants that I had bought previously straight into the raised beds; including tomatoes, green and red cabbage, broccoli, kohl rabi, brussel sprouts, red peppers and jalapeno peppers, cauliflower, leeks, northern lights Swiss chard, kale, anise, chervil, dill, fennel, curly and Italian parsley, and marigolds for both color and to keep pests away.  So already, things are growing in the garden! I also have celery and two types of red lettuce but I will have to try and fit those somewhere else.

Note the VHS video tape that I tied onto the garden fence (below). This tape is very effective in keeping wild animals (including birds) out of your garden as it rustles and moves in the slightest breeze. Also, because it’s shiny it reflects light which also makes the animals uneasy. I recommend taking it down every fall and replacing it with fresh tape every spring. Unfortunately, you will be picking up the odd bit of tape after heavy winds but it is truly worth it, knowing that a deer or rabbit is capable of eating everything in this garden within 30 minutes. It also helps that I have Lucy, as wild animals tend to avoid areas where they detect the scent of a dog.

I tied pie tins and other noise makers to the posts. The also reflect light and when the wind blows they bang against the metal and make random noises, again keeping the wild animals at a distance.

It’s been a few longs days but the garden is now planted and safely fenced. I still have a few things to find room for and will be adding a few more large pots for the center area for summer squash. I am going to have to be creative in finding room for the winter squash, cucumbers, beets, beans and peas. Next year, the second row of raised beds will double my planting space but until then I will make do with what I have.

I look forward to sharing the garden with you as it grows over the summer as well as all of the scrumptious cooking and preserving I will be doing with the harvest. For now, its a glass of wine and a hot salt bath for me! Cheers everyone… and may you enjoy your own gardens this season!

Share this:

  • Twitter
  • Facebook
  • Pinterest
  • Print
  • Email

Like this:

Like Loading...

E plants her first garden

21 Monday May 2012

Posted by Delena Rose in garden

≈ Leave a comment

Tags

carrots, cucumbers, gardening with kids, greenhouse, lettuce, peas, planting seeds, potatoes, pots, soil

On Saturday, E came over to plant her first garden! In preparation, she chose and bought 5 packets of seeds and brought them over. She will be growing lettuce, peas, cucumbers, orange carrots and a fancy purple striped carrot. Friend, J, came over and helped us haul the potting soil. Here we are making our way to the greenhouse.

It was a cold morning so we were grateful to be working in the greenhouse. I had set aside the back bed for E’s garden and had found a stack of old plastic pots that were left behind by the previous owner of the cabin. We decided to grow her vegetables in pots so that I can move them outside once the weather is warmer (the location of the greenhouse is in partial shade), and also so that (if she chooses) she could put a whole pot in her wagon and wheel it home to harvest the fruits of her labor with her family’s participation.

E began by arranging the pots then filling each with a mixture of potting soil and compost. She planted a different vegetable in each pot, taking care to read the directions for spacing and depth.

Then she watered each pot and made labels out of plastic garden markers. E read how long each will take to germinate and we figure that by the time she returns in two weeks that she’ll have baby plants sprouting in each pot! In the meantime, I will keep the pots moist and warm. Later, we’ll build a mini trellis for the peas and the cucumber to climb up and I will scrounge around for a few more pots so that she can plant potatoes next time! Once school is out, E can visit her garden as often as she likes to garden and weed and, the most exciting part…. to harvest!

Share this:

  • Twitter
  • Facebook
  • Pinterest
  • Print
  • Email

Like this:

Like Loading...

spring planting… and the greenhouse gets a new door!

13 Sunday May 2012

Posted by Delena Rose in garden, restore, reuse

≈ 3 Comments

Tags

French door, glass door, greenhouse, greenhouse made from old windows, new door, restoration, spring planting, spring plants

At last! At long last, the greenhouse has a new French door! Let me remind you of what the greenhouse looked like last year before I tackled the restoration project:

I don’t think that the greenhouse had been used in quite a few years. Of course, I immediately fell in love with it!

Here is the ‘almost-finished’ project last spring. The last thing it needed was a new door. The old is was hollow and had a family of bats living in it. All summer long, whenever I was working in the greenhouse I could hear them scratching away in there.

Not too long ago, my wonderful friend B found this French door in his sister’s garage. As it was no longer needed he brought it over to the cabin, cut it down to size and moved the door knob from the old door to this new door.

Installing it was a challenge as there wasn’t a single straight or level line in this ramshackle building! Thankfully, B was up to the task with chisels and planes! Once the door was installed, I applied two coats of primer, two coats of exterior black paint and a bead of black exterior-grade caulking around the windows, inside and out (again, using painter’s tape on the glass for this task to get a perfectly straight line).

I spent yesterday afternoon vacuuming cobwebs and washing the entire building inside and out. Then polished up the windows and installed a small hook and latch to keep the door from blowing open (the latch of the old knob doesn’t always catch). As you can see, the glass door will let in much more light. I will build a few bat houses to install nearby as I really do appreciate them.

Finally, I planted the plants! This year I put in cherry tomatoes, two types of roma tomatoes, many herbs (especially basil), and a variety of salad greens in the back as they don’t mind partial shade. I also reserved an small area for my friend E who is going to have her own bit of garden space and will plant some of her own seeds next time she comes over.

Now onto the Medicine Wheel garden project where today I am building raised beds…:)

Share this:

  • Twitter
  • Facebook
  • Pinterest
  • Print
  • Email

Like this:

Like Loading...

harvesting dillseed (Anethum graveolen) for the kitchen

16 Wednesday Nov 2011

Posted by Delena Rose in cook, garden

≈ 2 Comments

Tags

chew spice, cook with dillseed, dill, dill seed, dill tea, dillseed, spice

The scent of a lush stand of dill is one of my great gardening pleasures. I love to breathe in the remarkable aroma, a heady blend if mint, citrus and fennel, with a hint of sea air. ~ Lois Hole

Native to the western Mediterranean basin and western Asia, dill (Anethum graveolen) is easy to recognize when growing in the garden. Closely related to fennel, it is an upright, hardy annual, growing up to 2-3 feet tall, with glaucous, ovate leaves that further divide into thread-like segments. The tiny yellow flowers grow in the shape of an umbrella in summer and develop into flat, oval seeds by late summer-early fall.

The leaves, stems, flower heads and seeds of this aromatic herb are all edible. Harvest dillseed when the flower heads turn brown. When ripe, the seeds will fall off easily when brushed up against or touched. Store the flower heads in a paper bag to allow them to dry out even further. Then shake the dried flower heads and/or gently rub them to release the seeds. Remove all remaining stems and store in a clean jar with a tight-fitting lid.

Dill is a traditional Middle Eastern herb that has been important since Biblical times. Its leaves and flowers were found on the mummy of Amenophis II (c.1425BC) and both the ancient Egyptians and the Copts used dill medicinally. It is mentioned as being subject to a tithe in the Talmud (ancient Jewish law), and in ancient Rome, Pliny (AD23-79) extolled its numerous uses. Classified as a cooling carminitive, dill has been used in Ayurvedic medicine for thousands of years. ~Denis Brown

Dillseed are small and flat, with thin wing-like ridges. Their warm, sharp smell has been described as reminiscent of fennel, caraway and mint. When ripe, the seeds are toxic to birds (Fortin, 1996).

The Romans believed that dill was a “fortifying” herb, so it was common practice for gladiators heading into the arena to cover their (possibly) last meals with the herb to bolster their strength. The Romans were probably responsible for carrying dill to many of the regions where it now grows. ~ Lois Hole


Medicinal Uses:

  • Ease indigestion (calming, toning effect on the digestive system)
  • Carminative effects (eases gas)
  • mild diuretic
  • antiseptic
  • antispasmodic
  • colic (notably in the form of gripe water for babies)
  • increase milk production in nursing mothers

In Traditional Chinese Medicine, dillseed is considered a yang tonic food, whose effects include: warming the kidneys, improving appetite, dispersing cold, promoting energy circulation and counteracting fish and meat poisoning (Lu, 1996).

Make a mix of carminative seeds, such as anise, cardamom, cumin, dill and fennel, and chew them at and between meals. These are all very helpful in reducing gas and bloating.

Culinary Uses:

  • soups, salads and stews
  • pickling spice
  • seasoning vinegars and marinades
  • cold sauces
  • flavor breads, potatoes and sometimes pastries
  • in the preparation of salmon and crayfish (particularly in Scandinavia)

According to Fortin, “…dill goes very well with tomatoes, celeriac, beets, cucumbers, cabbage, fresh and sour cream, cream cheese, white sauces, melted butter, salad dressings, eggs, stews and seafood (1996: p. 469).

To ease digestion, steep 2 teaspoons of dillseed in 1 cup water for 10-15 minutes. Strain. Take ½ cup 2-3 times daily. ~Mindell

Until today, I have only used dillseed twice, and both in pickling recipes. This evening I have been chewing the seed mixture and sipping the tea and am excited about all of the other ways I can incorporate this delicious and versatile spice into my diet! I’m thinking of starting with the salmon…

Resources:

Brown, D. (2001). Herbal: The essential guide to herbs for living. Pavilion Books Ltd.: London.

Fortin, J. (1996). The Visual Food Encyclopedia. Les Editions Quebec/Amerique: Montreal, Quebec.

Gladstar, R. (2001). Rosemary Gladstar’s Herbal Recipes for Vibrant Health: 175 teas, tonics, oils, salves, tinctures, and other Natural Remedies for the Entire Family. Storey Publishing, North Adams, MA.

Harkins, M.G. (2002). Spices: From the Familiar to the Exotic- Recies from Around the World. Ryland Peters & Small, Inc.: New York.

Hole, L. (2000.) Herbs & Edible Flowers: Gardening for the Kitchen. Holes: St. Albert, Alberta.

Lloyd, C. (1997). Gardener Cook. Willow Creek Press: Minocqua, Wisconsin.

Lu, H. (1996). Sterling Publishing Company Inc.: New York

Mindell, E. (1992). Earl Mindell’s Herb Bible. Simon and Schuster: New York.

Werle, L., & Cox, J. (2000). Ingredients. Konemann: Cologne.

Share this:

  • Twitter
  • Facebook
  • Pinterest
  • Print
  • Email

Like this:

Like Loading...
← Older posts

Shop our Online Store

cabinorganic logo

Visit our Youtube Channels

Visit our other blogs

Delena Rose

Enter your email address to follow this blog and receive notifications of new posts by email.

RSS Links

RSS Feed RSS - Posts

RSS Feed RSS - Comments

categories

  • Alberta Mycological Society (1)
  • appreciate the seasons (48)
    • Autumn (3)
    • Easter (1)
    • Halloween (1)
    • winter fun (1)
  • art (3)
    • book making (1)
    • pottery (1)
  • babe and child (1)
  • barn (1)
  • be mindful (4)
  • bellybabechild (5)
  • birds (3)
  • butterflies (1)
  • buy local (13)
  • cabin living (26)
  • Chayton (4)
  • chickens (7)
  • chocolate-making (1)
  • cook (156)
    • ancient grains (3)
    • breads (4)
    • breakfast (1)
    • cakes and brownies (1)
    • cheese (3)
    • Chinese (1)
    • cookies (2)
    • curry (2)
    • gluten-free (2)
    • Jamaican (1)
    • Mexican (2)
    • muffins (2)
    • oil & vinegar (1)
    • pastry (1)
    • preserve (17)
    • rice (1)
    • salads (1)
    • vegetables (1)
    • wheat-free (2)
    • whole grains (21)
  • Devonian Botanical Garden (2)
  • DIY (1)
  • drum (2)
  • eco-living (6)
  • explore (5)
  • family (2)
  • for the body (2)
    • Wizard Lake Soap & Body (1)
  • forage (25)
  • garden (20)
    • bird butterfly bee (1)
    • greenhouse (1)
    • herb & tea (1)
    • medicine wheel (2)
  • handmade (24)
    • bent wood furniture (1)
    • books (1)
    • labels (1)
  • healing (3)
  • Indian (1)
  • Indigenous teachings (1)
  • juice (3)
  • kids (1)
  • lake living (4)
  • local events (2)
  • Lucy (10)
  • make it (14)
    • knit (3)
  • mindfulness (4)
  • more about us (9)
  • Mother's Day (1)
  • mushrooms & fungi (3)
  • Native flute (1)
  • online store (1)
  • photography (1)
  • Pigeon Lake (17)
  • play (4)
  • raw foods (2)
  • read (6)
  • refinish (4)
  • reflections (3)
  • repurpose (7)
  • restaurants (1)
  • restore (10)
  • reuse (5)
    • thrift store finds (1)
  • seeds and nuts (1)
  • sweets (3)
  • tea (9)
    • Dragonfly Lane Teas (1)
  • thrift store finds (1)
  • Uncategorized (1)
  • wild berries (21)
  • wild flowers (6)
  • wild life (2)
  • wild mushrooms (2)
  • wild plant (2)
  • wild women (5)
  • Winter Solstice (1)
  • Worms (1)
  • write (3)

archives

  • May 2022 (1)
  • March 2022 (1)
  • January 2022 (3)
  • December 2021 (2)
  • June 2018 (1)
  • January 2018 (3)
  • December 2017 (4)
  • April 2015 (1)
  • January 2015 (3)
  • November 2014 (3)
  • July 2014 (1)
  • April 2014 (4)
  • March 2014 (3)
  • February 2014 (2)
  • January 2014 (2)
  • December 2013 (1)
  • November 2013 (5)
  • October 2013 (4)
  • September 2013 (10)
  • August 2013 (4)
  • May 2013 (1)
  • April 2013 (2)
  • March 2013 (5)
  • February 2013 (3)
  • January 2013 (5)
  • December 2012 (5)
  • November 2012 (5)
  • October 2012 (6)
  • September 2012 (8)
  • August 2012 (6)
  • July 2012 (8)
  • June 2012 (9)
  • May 2012 (19)
  • April 2012 (18)
  • March 2012 (15)
  • February 2012 (17)
  • January 2012 (19)
  • December 2011 (20)
  • November 2011 (18)
  • October 2011 (17)
  • September 2011 (22)
  • August 2011 (27)
  • July 2011 (9)

food for thought

“Eat food. Not too much. Mostly plants.” ~Michael Pollan

Blogroll

  • Alberta Lamb Producers
  • Alberta Mycological Society
  • Alberta Plant Watch
  • Arctic Chalet
  • Aroma Borealis
  • Baking Beauties
  • Becoming Minimalist
  • Blue Heron Artists and Artisans
  • blue roof cabin
  • Bulk Herb Store
  • Cedar Spirit Flutes
  • Chris Martenson
  • Daily Health Boost
  • delightfullysimple
  • Devonian Botanical Garden
  • ECOcafe
  • Elm Cafe
  • Etsy
  • Gold Forest Farms
  • Grainworks
  • Happy Wrap
  • Learn WordPress.com
  • Michael Pollan
  • Mindsprings
  • Mother Earth News
  • Mountain Rose Herbs
  • My Repurposed Life
  • Noorish
  • Northern Alberta Society for Animal Protection
  • Pigeon Lake Nordic Ski Club
  • Pigeon Lake Provincial Park
  • Rundle Mission
  • Sage Mountain Herbal Retreat Center
  • TED
  • The Spirit Books
  • The Story of Stuff
  • The Village at Pigeon Lake

ECOcafe

Blog Stats

  • 316,372 hits

  • Follow Following
    • cabinorganic
    • Join 154 other followers
    • Already have a WordPress.com account? Log in now.
    • cabinorganic
    • Customize
    • Follow Following
    • Sign up
    • Log in
    • Report this content
    • View site in Reader
    • Manage subscriptions
    • Collapse this bar
 

Loading Comments...
 

    %d bloggers like this: