~ For people who are passionate about respecting the earth, walking in nature, observing wildlife, local diet, making do, repurposing, organic gardening, foraging for wild plants and fungi, natural health, scrumptious healthy cooking, renovations, DIY, crafting, raising children simply and mindfully, taking time for stillness, and living in harmony with the seasons.
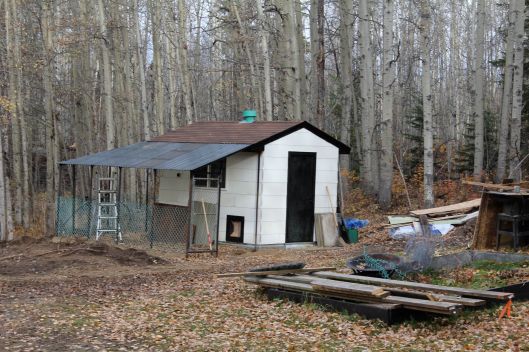
On November 26, 2014, I left you hanging with an unfinished chicken coop. It’s time to fill you in on the details of how we got from there (below)… to our beautiful coop here (above).
Winter came and we had to put the project on hold. Once spring arrived we were ready to keep working on the project, and with chicks booked for April, we were motivated to finish setting up their home. We started with the interior: Brian painted the walls, installed eight nesting boxes (using recycled lumber), and Grandpa made the roosts (using an old metal bed frame, recycled metal and lumber).
I put up curtains to keep the chickens from roosting in the nesting boxes. It really works.
Our roosts are all at the same level and the entire unit swings upwards and can be held by the metal hook (top right) for easy cleaning. The droppings board slides in an out like a drawer and can be removed easily for spring cleaning. Each morning, I scrape the manure off of the board and into a bucket with a paint scraper. I also pick up manure off of the sand (and out of the yard sand) with a kitty litter scoop.
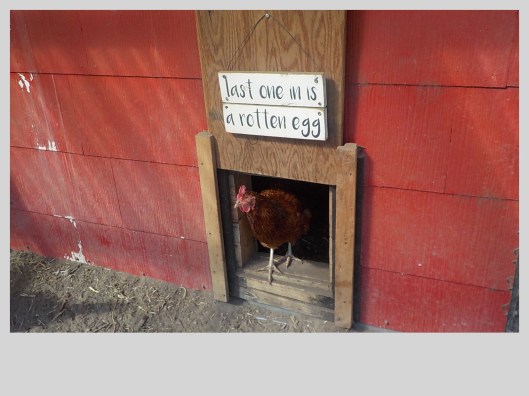
Then Brian and our then-three-year old son, Chayton, got to work painting the exterior.
I love the red colour and how it adds such vibrancy to the coop.
Brian used parts of an old jungle gym to create roosting spaces for the chickens out in the small yard.
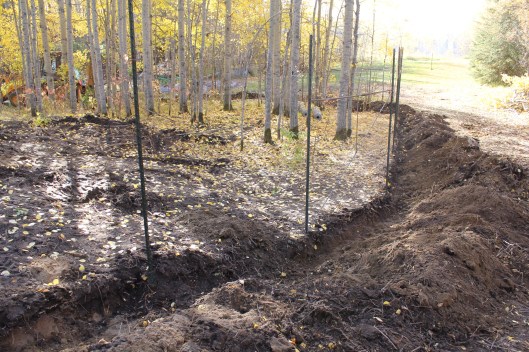
Another major project was setting up the larger yard (accessed from a pop hole in the small yard) to give the chickens much more space to roam. As our property backs onto 150 acres of protected land, we need to protect our chickens from the fox and coyotes that frequently pass through. Grandpa used his backhoe to dig a trench, 18-inch deep, all around the larger yard’s perimeter. Then we constructed a fence using stucco wire and T-posts, and tied everything together with wire. Grandpa welded a main gate using an old metal bed frame and there is a provision for a larger gate (to accommodate a tractor) in the back area.
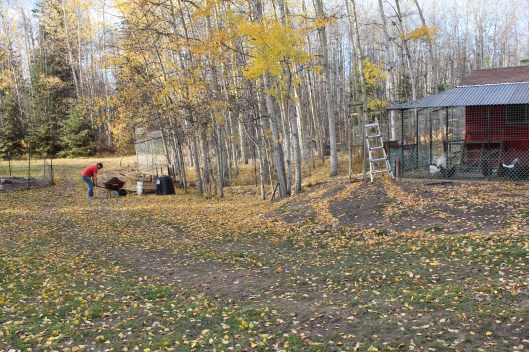
Grandpa Dale located another shed and put it beside the coop. Then the Lake family (remember Erin and Mitch?) gave us a metal outhouse (“Burton’s Pooper”), which was placed next to the new shed. They also gave us the metal skeleton of a canvas carport. Grandpa reinforced this with metal rods and put the whole structure on skids. Then he and Brian covered it with tin. All that is left to do now is to put some doors on it.
Jenna, Chayton’s sister, helped me paint the middle shed. By the end of summer I also had the pooper painted.
Later, Brian added shelves to the pooper and we now use it as rodent-free storage for feed and equipment. The teal shed (middle) has been used for chickens, goats, and even an injured duck (more on these later).
This is what the entire set up looks like today. We’ll add doors to the tin shed this coming summer.
We are loving the the colours, especially now in the winter. I’ll do another post focusing on the winter set-up as Brian covers the yard in plastic, turning it into a warm greenhouse for the chickens during the coldest months.
I hope you enjoyed the story of our coop. There will be many more posts featuring these buildings along with the interesting animals that live in them.
I recently met a very creative woman named Anita who makes the most wonderful bags. Along with the shoulder bags featured in the pictures here, she also makes clutch bags, make-up bags and wallets. Each of the bags is Anita’s own design and even the crochet stitch that she uses is unique.
What makes these gorgeous bags extra special is that they are 100% made from plastic shopping bags. Anita starts by collecting the shopping bags and many of her friends help her by saving bright, uniquely colored bags for her. Then she cuts these into strips. Each large bag reuses 50 plastic bags and takes about 10 hours to make (smaller bags take a little less time). Anita crochets these using a double strip of plastic, which explains why her bags are so strong. You can easily fill a bag with canned goods at the grocery store and the bag will not stretch or break. The lovely variations of colors in the designs come from the actual plastic bags.
I love these bags! It is inspiring how Anita takes what we consider a ‘waste product’ (headed to the recycling station or worse, the landfill) and turns it into something very useful and beautiful. These artful bags remind me of the designer beach bags I saw in Hawaii for sale in every tourist shop. As Anita’s bags are waterproof and lightweight they are perfect as swim bags, grocery bags or book bags for library visits. If they get dirty they can be hand-washed with soap and water and hung to dry.
Anita is based in Calgary and charges $10 per large bag, $5 for the clutch and make up bags and $1 for the wallets. If you are interested in purchasing any of these bags, you can reach Anita by email: abholmes@shaw.ca or if you like any of the shoulder bags pictured here, email me at delena@cabinorganic.com and I can mail or drop off the bag(s) of your choice. I see Anita about once a month now so I can easily pick up any orders if you live in the Edmonton area.
Thank you for sharing your great idea and your gorgeous bags with us, Anita!
Walking down this residential road in a quiet area of the lake, you would never guess that hidden just a short distance into the woods is a magical place. Even if you had heard a rumor that it existed, you probably would never find it, unless you were prepared to wade through knee deep mud and water, cross a small river and fight through five foot high stinging nettles. Even then, you still may never find it.
Four days ago, there was a knock on my door. Lucy went wild, barking and letting me know that people were here at the cabin. (We rarely get visitors.) As I opened the door, I saw five smiling faces. Glancing down, I saw five pairs of rubber-booted feet. The children introduced themselves and explained that they were building a fort. They were wondering if I had any plywood or any other materials I could donate to their project. Their request came at the perfect time as I had just begun sorting through the scrap wood I had inherited when we bought this place in order to see what I could salvage for the chicken coop. I invited them out back to show them the wood. Lucy was unsure of them at first. She barked for the first few minutes, then cautiously sniffed each child, one by one, while we pretended not to notice. A few minutes later, she had five new lifelong friends. The kids petted her, played with her, scratched her and got her to do all kinds of tricks. Lucy just soaked up the love and attention like a sponge.
Meanwhile, behind the cabin, the kids took a look at what I had and found some things that were useful for their project: two small railings, broken pieces of corrugated roofing, a small roll of discarded carpet, wood of various sizes, even a pair of crutches. They left, carrying one large piece of plywood and the roll of carpet. Then they returned with a wheel barrel and a little red wagon to haul the smaller pieces. They thanked me and said that when they were finished the fort, they would invite me over to come and see it.
Just three days later there was another knock at the door. My new friends were back and were ready to show me the fort, which they had just completed that afternoon. I grabbed my camera, jumped into my rubber boots and headed off down the road with them (leaving Lucy behind. ‘Sorry my girl, too muddy!’). I followed them down the road, then we turned off onto a trail leading into the woods. We walked, waded through deep water and mud, ducking under tree branches and tried to avoid the stinging nettles along the path.
We continued to walk, crossing a small river and as the path turned around a bend, I saw the fort and it took my breath away.
It was magnificent. The most splendid fort I have ever seen, far better than the ones I built when I was younger. The fort was two stories tall and nestled in between the thick curving branches of a tree, which added to the stability of the structure.
The lower floor has a bright green door. Inside, there is a bench and a shelf holding a bucket and soap to wash your hands. Believe it or not, this fort has running water! Rigged up above is a bucket to catch rainwater. There is even a stainer to filter the water before it flows down.
Also inside the lower floor is a small window made from a natural gap between the boards and covered with a piece of snowmobile windshield, cut perfectly to size.
There are two sets of ladders leading up to the second level, one made of lumber and the other made of tree branches. Upstairs, there are three places to hang out: the main open area, a small side area with railings (pictured below), and the roof, which is carpeted and very comfortable.
The floor of the main open area (above) also serves to shelter an area down below. There is even a handy place to hang your coat. I was invited to climb up to the second floor and was amazed at how solid and stable everything was. The kids explained that they used screws, nails and even string to hold it all together. If you look closely at the structure, you can see the resourcefulness of these builders as they used everything, from crutches and broom handles to scrap lumber and tree branches to build this fort. Many of these materials were probably headed to the landfill but instead were now put to good use in the making of this beautiful, solid, weatherproof, top secret fort.Off to one side of the fort is a bridge to cross the river (the water is low at the moment) and a length of rope serves as a handrail.
Beside this is one of three sturdy swings.
I was so impressed with their handiwork! The fort really demonstrates the creativity and problem-solving abilities of my five new friends! Even the spot they chose for the fort felt very magical, surrounded by river and woods and with a large tree wrapping around it. This tree provides shelter and a place to walk on without having to touch the muddy ground. Impressed, I complimented each of them on their building skills.
Just when I thought I had seen it all, they asked if I would like to see the dance floor. Dance floor??? Yes, this fort has it all! Very close by, propped up on (and nailed to) two saw horses was a very stable piece of plywood, just big enough for a small group of people to dance on underneath the stars.
I would like to thank my new friends, M,M, K, E and J for allowing me to contribute some materials to their amazing fort and for inviting me over to see it. (Sorry, I cannot tell you, dear readers, where it is located as I am sworn to secrecy.) It was a delight to see that my old, discarded materials were now useful, appreciated and given a new life in your fort. It was a pleasure to meet you all and spend time with you. I hope to come back again soon, take off my rubber boots, and boogie, once more, on your dance floor!
The chicken coop is coming along. Two weekends ago, H and I spent a day gathering materials, the next day positioning and digging concrete blocks into the sandy soil (H did all of the work here), and then the next day assembling most of the deck frame with pressure treated wood (until we were rained out). Lucy helped a little by double-checking the level.
We are building a 10x 14 deck to float above the ground. A smaller 6×10 shed will be placed on top of this and the deck will extend a few feet on all four sides. This will hopefully resemble the flooring that often extends from inside of the building out into nature, as seen in many traditional Japanese teahouse and country home designs. It is mostly for show, but the deck will provide the perfect place to stack hay bales around the exterior walls of the coop for additional insulation in our very cold Alberta winters.
For the past week, I have been staining the planking that we bought for the floor of the deck. I found some old stain left behind by the previous owners so I used it to stain the bottom and sides of the decking. I will stain the top (the only part that will be seen) with a new darker stain and then add a few coats of low gloss varathane to give it a deep sheen. I chose not to use pressure treated wood for the top deck planks as I wanted a more rustic look. The wood that I bought is not perfectly straight or rounded on the edges, and it still has the bark on it in some places. I like that. It has a more natural feel. Less manufactured.
We used new lumber for the frame and the salvaged lumber for the support pieces. We will do this for the walls and window/door framing as well. Speaking of which, tomorrow I am visiting two architectural salvage places in Edmonton in search of a window and a door. I also hope to find a French door for the greenhouse. Wish me luck!
Breakfasts on the weekends are often the best meal of the day here at cabinorganic. If it’s just me, I’ll enjoy a whole grain hot cereal with some dried fruit thrown in. When a friend is here, I put a little more time and effort into the weekend meals. It is also nice to have someone to try out my new recipes on! This morning we had poached local organic free-range eggs (from Dreamin’ Green Farm) and some locally-raised bacon, along with a Wild Berry Salad made with all wild ingredients or produce from our garden (not including the toasted almonds). The Potted Saffron Brioche on the side (with Swamp Red Currant Jelly) gave the meal a creative and decadent twist. The wild berries in the salad were so fresh that we couldn’t resist cracking open a bottle of Saignee, a fruity Canadian rose wine that we picked up at the Silk Scarf Winery (highly recommended!) on our recent trip to Summerland, BC. (…where we stayed in a B&B at a working vineyard. But that’s another story…).
Rich and buttery, brioche is the perfect sweet bread for breakfast. The use of tiny flowerpots makes a nice presentation but be sure to prepare them before baking.
Potted Saffron Brioche
Preparing the Pots
I had some tiny little terra cotta pots left over from a preschool craft (back when I was teaching) just waiting for a special project. In my newest purchased cookbook, World Breads: From Pain to Paratha by Paul Gayler, I finally found the perfect use for them and a perfect repurposing idea! You can find these tiny pots at your local craft store.
To prepare the flowerpots for baking, wipe them thoroughly with a damp cloth. Oil them generously inside and out and put them in a 275 degree (F) oven for 30 minutes to season. Remove and cool. Then repeat this process twice more. This will prevent the molds from cracking while baking.
The Saffron Brioche
1/3 cup milk
pinch of saffron
1-1/2 teaspoon active dry yeast (or 1/2 oz fresh)
3 eggs
3/4 cup butter, softened
2 teaspoons superfine sugar
3 cups unbleached organic white bread flour
1/2 teaspoon fine sea salt
1 egg yolk mixed with 1 tablespoon of milk, to glaze
Heat the milk with the saffron for 2 minutes, cool to lukewarm, then add the yeast, salt, and eggs. Add 2 of the 3 cups of flour, mixing well with a wooden spoon.
In a large mixer, cream the butter and sugar until smooth and fluffy. Incorporate this into the flour mixture, adding the final 1 cup of flour.
Transfer dough to electric mixer bowl and beat with dough hook for 3-4 minutes, until smooth and pliable.
Cover the bowl with a damp cloth and let rise in a warm place (or in your oven at the proof setting) for 1-1/2 hour or until the dough has doubled in size.
Punch down the dough, cover with oiled plastic wrap and place in the refrigerator overnight. (The dough will stiffen overnight.)
Turn the dough onto a lightly floured surface and divide evenly into 16 small balls. Place each of the balls into a lightly greased, prepared flowerpot lined with parchment paper (or in your brioche cups or muffin stoneware). Place the molds on a large baking sheet, cover and leave in a warm place to rise for about 1 hour.
Preheat oven to 400 degrees (F). Brush the glaze over the top of the brioches. Bake for 10-12 minutes or until golden brown. Place on a cooling rack. Yield: 16 brioche.
Note: this dough can be baked in a loaf pan or shaped into small rolls.
Wild Berry Salad
Use your freshest ingredients from the garden. The sweet grated beet balances the tartness from the berries and the lemon juice. The almonds add a pleasant, toasty crunch.
1 head red lettuce
half of a medium red onion, thinly slinced
1 medium beet, peeled and grated
3 tablespoons extra virgin olive oil
2 tablespoons raspberry vinegarette
juice of half lemon
salt and pepper (to taste)
1/4 cup sliced almonds, toasted
1 cup wild berries (I used a mixture of Swamp Red Currants, Northern Black Currants, Canada Gooseberries, Saskatoons berries, wild strawberries and raspberries.
Wash the lettuce and tear into small pieces.
Add lettuce, onion, beet and 3/4 of the berries to the bowl.
In a separate bowl, mix the olive oil, vinegar, lemon juice, salt and pepper. Add this to the lettuce mixture and toss.
Top the salad with the toasted almonds and the remaining /4 cup berries.
When we bought the cabin last fall, we inherited this quaint little greenhouse. I love that it is made with recycled windows- a great repurposing project! Unfortunately, it had been neglected for many years and was currently being used to store junk. It needed a lot of work. The paint was almost completely worn off, the wood was rotting in places, ten of the window panes were cracked or missing altogether, there was broken glass all over the ground under the extra windows at the back of the greenhouse, and it had become home to a large colony of ants and a family of bats.
Here is a shot taken during the winter. I was told (by our realtor) that the tire is from a Model T Ford. Any collectors out there?
Of course I fell in love with the greenhouse immediately and couldn’t wait for spring to arrive when I could take on the enormous task of lovingly restoring it back to its original purpose: a vibrant place to grow things here in our short Alberta summers.
Inside, the soil was very dry and dusty and covered in bits of plastic sheeting that disintegrated into a million tiny pieces whenever you tried to pick it up. There were layers and layers of spider webs everywhere.
When spring finally arrived, H and I began by moving all of the junk out. I cleaned the interior thoroughly using a broom, a shop vac and buckets of soap and water. Just under the roof (not pictured here), there is a large rectangular reservoir made of tin. I believe it was used to hold water, which then flowed into a tank which directs the warm water into the irrigation hoses that are buried in the soil. This reservoir was one-quarter full of bat guano! I had to get up on a ladder, and wearing a mask and goggles scraped and swept up bucketfuls of bat poo. I also had to remove the birdhouse as it had an active wasp nest in it. I did this early in the morning while it was still cold and the wasps presumably sleeping. I wrapped the birdhouse in a pillowcase (in case they flew up and swarmed me), gently removed the nails holding it in place and put the birdhouse carefully on the ground some distance away, removing the pillowcase.
I replaced all cracked and missing windows with panes taken from the extra windows that were once leaning against the rear of the greenhouse. Then I taped all of the window glass with painter’s tape, inside and out, in preparation for painting. As you can imagine, the taping was very tedious with all of those individual window panes. (And I taped all of the windows THREE TIMES during this process!) We should have bought shares in the company before I started this project!
Next, I primed all of the wood, inside and out. I had to give it two generous coats as the first coat seemed to be completely absorbed into the old, dry wood.
Here is a look at the interior after priming…
Here is a view of the back of the greenhouse…
Next came two coats of exterior semi-gloss black paint. The roof still looks awful as it needs to be replaced but that will have to be a future project.
Once the paint was dry, I took off all of the painter’s tape and washed the widows thoroughly. Then I re-taped the windows in preparation for caulking. I caulked the interior windows with black caulking, peeling off the tape before it set. This makes the caulking job look ‘clean,’ leaving crisp straight lines. Once again, I cleaned the windows.
Here’s a corner view. You can see where I transplanted some peonies that were previously growing in the front yard. My neighbor C also gave me some rhubarb, which I planted on the left side here.
Here is a view of the front. There is still an old damaged door (not shown here). It has some bats living in it so any time I am working in the greenhouse I can hear them scratching away in there. I will be replacing this door with a secondhand French door from the Architectural Clearing House in Edmonton. Unless any of you have a glass door you want to sell me on the cheap? I’ll even cook you dinner out here as part of the deal…
Here is the back of the greenhouse. I hung up some old rusty tools that I found around the property. I also moved the concrete blocks to the future chicken coop location as they will come in handy as part of the foundation there.
Here are a few shots of the interior…
Inside, H and I removed half of the dry, dusty soil. We added and dug in manure, compost and potting soil and then topped this with three inches of mulch to hold the moisture in. This picture was taken in early June.
I planted four different kinds of tomatoes, six different kinds of chili peppers, six different kinds of basil, parsley, cilantro, summer savory, tarragon, chives and there is a nasturtium plant in there as well. (I also have lots of herbs growing in a separate herb and tea garden as well as in my veggie garden).
Here is a shot taken just today. Notice that the tomatoes are growing up a length of string for support. This is old baling twine that I found near the barn when we were cleaning the manure off of the concrete pad. A length of this twine is tied to a nail on a beam above, the lower end is loosely tied to the base of the tomato plant while it is still young. As the tomato grows you gently wind the string around the plant. Be sure to provide some slack so that the twine doesn’t become too tight.
This is still a work in progress. I still have the door and roof to replace and I would like to caulk the exterior windows. I plan on putting a flagstone path in the ground at the front door along with a few large red clay pots with some bright red flowers. I am also looking for a weathervane to install on the roof. I have planted a few vines at the two front corners of the greenhouse, which, I hope over time will grow up the corners and under the roof line. Next summer, I will install brackets for two hanging baskets for more bright red flowers (yes, I really like red).
All in all, this has been a very useful restoration project so far. Did I mention that the greenhouse already has power, water, shelves to store my terra cotta pots and a little potting table? As it has been a cool, wet spring and summer so far here in Alberta, my plants in the outdoor gardens are healthy but still small. Meanwhile, the plants in the greenhouse are thriving and gigantic in their warm, humid little home. One of my tomatoes is now even touching the ceiling, it has grown so high!
I hope you enjoyed seeing this restoration project take shape. I actually just painted the back wall and installed the rusty tools just this afternoon. We have had so much rain that finishing the painting kept getting postponed.
I’ll keep you posted on any further developments with the greenhouse. In the meantime, I look forward to hearing about your own gardens and restoration projects!
Just the idea of taking something that is old, broken, discarded or ignored and with a little work and some imagination, turning it into something else. Something different. Something new and useful.
Repurposing is something that many of us do all of the time without even thinking about it. Torn shirts become treasured quilts, a broken bed frame is turned into a fancy new sign for your business, a tin can is decorated by a child and used to hold the pens on your desk, a cracked teapot becomes a quaint home for a potted plant and a pile of unmatched colorful socks are knotted into that beautiful rug that welcomes you home from work each day at your front door.
Repurposing is simply taking an object and using it for something other than that which it was intended for. The item may be modified or simply used in a different way. Repurposing takes creativity, imagination and a playful attitude. Often, when we find a new use for something, we save money by not having to purchase the needed item brand new. We might choose to give it away as a unique one-of-a-kind gift or even sell it and make a little extra cash. For some excellent ideas and inspiration for repurposing projects, check out www.myrepurposedlife.net/ and http://blueroofcabin.blogspot.com. Then poke around in your garage and basement and hit a few garage sales or thrift stores for something to work with. Don’t forget to share your ideas or favorite repurposing blogs with me so that we can learn from each other!
One of my current repurposing projects involves turning the lumber from my old barn into a new chicken coop. Here is a picture of the old barn:
(By the way, that concrete pad to the right of the barn was a total surprise. A month ago it was entirely covered with a muck and wild plants. After stubbing my toe on something hard near the barn, I discovered a piece of concrete. H and I spent an entire afternoon scraping and shoveling and marveling at the treasure we were finding. First of all, it turned out that the muck was a pile of rich and perfectly aged horse manure. We moved many wheel barrels full of the precious poo to the garden to be lovingly dug into the soil. Then we uncovered this large 17×12′ concrete pad complete with fire pit. Amazing!)
H and I began dismantling the barn over the last three weekends. As H dismantled and piled up the old lumber, I removed as many of the nails as I could and sorted the pieces into what was still useful (to be repurposed) and what was too wet and rotten to use.
We worked at this for most of Saturday and my bucket became full of rusty nails. Someone once told me to bury rusty nails under my spruce trees and they will turn a deeper shade of blue. Has anyone tried this? If so, perhaps I can repurpose my nails as well.
I piled the useful lumber near the spot where the chicken coop will be. I will use it to frame the coop floor, walls and roof. I can’t wait to get started! H is designing a Japanese Teahouse and we will start building it next weekend on the concrete foundation where the barn used to be. It will be a slow project as he is only here on weekends but we plan on taking our time and enjoying the process. Meanwhile, I will use the repurposed lumber to build the chicken coop as a miniature version of the larger Teahouse. Eventually there will be a Japanese themed garden connecting the two Teahouses.
So, instead of being carted to the landfill, my old barn lumber is being repurposed into a new chicken coop. A very useful repurposing project! The coop will house and protect my future chickens and the chickens will provide rich manure and insect control for my organic garden as well as delicious organic eggs. By repurposing the lumber, I am saving money on building supplies and any money I make selling eggs will help pay for the chicken feed.
I’ll keep you all informed on our progress. In the meantime, take care and let me know how your own repurposing projects and ideas are going.