~ For people who are passionate about respecting the earth, walking in nature, observing wildlife, local diet, making do, repurposing, organic gardening, foraging for wild plants and fungi, natural health, scrumptious healthy cooking, renovations, DIY, crafting, raising children simply and mindfully, taking time for stillness, and living in harmony with the seasons.
On September 20, 2015, we installed a new window in one of the bedrooms of the cabin. The old window was put in by the previous owners and it wasn’t a very good one. The panes didn’t fit together properly and it let in a lot of cold air in the winter.
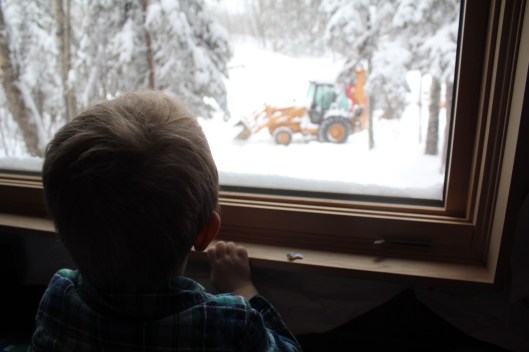
Pictured above is the old window. Brian sourced a new window on Kijiji (he is amazing at finding things on that site) and bought it. It was brand new and beautiful in its wooden frame. We stored it until Brian was ready to install it. As it was larger than the old window Brian and his dad, Dale, cut a larger hole in the cedar logs. (Dale is outside standing in the loader bucket of his backhoe.)
Once the hole was measured and cut, Dale and Brian brought the window over in the backhoe and installed it. They were quick and efficient as they had installed windows many times before. Chayton stayed in the room the entire time despite the cold and performed the important task of handing tools to daddy and grandpa. He was very interested in the whole process.
The backhoe made the job a lot easier as it provided a platform to stand on and did all of the heavy lifting.
This new window has really added to the quality of our lives: it is more attractive both inside and out, it is larger so we can now view the chicken coop from up there, and the bedroom is a lot warmer now in winter.
This project was a small step (among many) that we have been taking over the years toward maintaining the cabin and making it more energy efficient.
My good friends and neighbors, Brad and Mitch stopped by today to show me their latest project. You may remember them from a previous project of theirs- the complete restoration of a 1959 Glass Slipper. This father and son team have restored a number of boats together so I was quite surprised when this latest project turned out to be a bicycle. But not just any bicycle, mind you. A 1952 26-inch balloon tire Western Flyer bicycle.
I recall asking Brad last summer what his next project would be, shortly after completing his latest boat restoration and hearing about the Western Flyer for the first time. He had already begun searching online for one and finally found the right bicycle on ebay from a seller in Texas.
I love the history behind this bicycle. First, like many other things designed in the futuristic 1950s (cars, motorcycles, bikes, even appliances…), the Western Flyer was styled after jets and rockets. The first picture above shows a close up of the jet-inspired exhaust.
A second interesting bit of history was that these Western Flyers were often used by newspaper delivery boys. The riders would have to travel for miles through towns and rural areas. They could pedal these bicycles or they could motorize their bikes with a kit available for purchase. Sometimes there would be a promotion where kids who delivered the most newspapers could win one of these motors as a prize.
Brad purchased a reproduction of the 1950s bicycle motors that they were using back in the day, however, he and Mitch still had to customize the entire kit in order to make it all fit and they built a custom exhaust.
I love that they left the rust alone and they admitted that they had no intention of painting this project. You just can’t recreate that gorgeous patina and it makes me wonder where this vintage bicycle has travelled and what stories it would tell if it could speak.
Brad and Mitch took the Western Flyer out for a first run two weeks ago. Unfortunately the chain guard popped the clip off of the master link and the chain piled up. That was the end of that trip and it was back to the garage for tweaking.
Today was their second test run, this time with the custom exhaust installed, and the ride went perfectly without a hitch. The boys even got some early spring sunshine on their ride after a morning of heavy cloud cover. Over a glass of lemonade, they shared the story of their project- both the challenges and the satisfaction of finishing it, and generously allowed me to share their story.
I am sure there will be many more hours of riding and adventures on this beautiful bicycle!
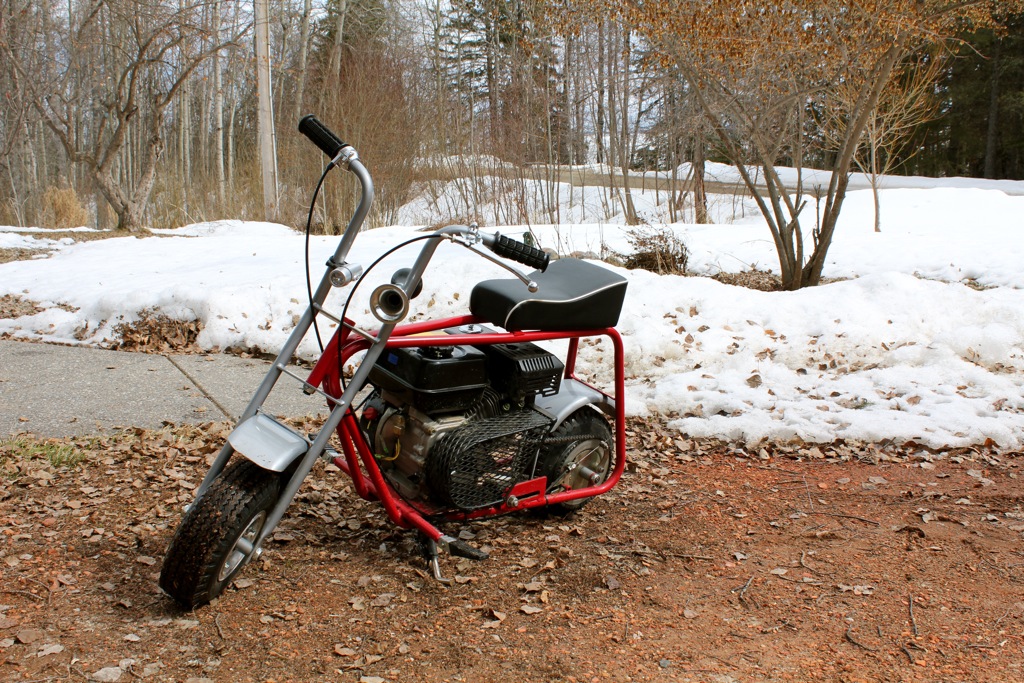
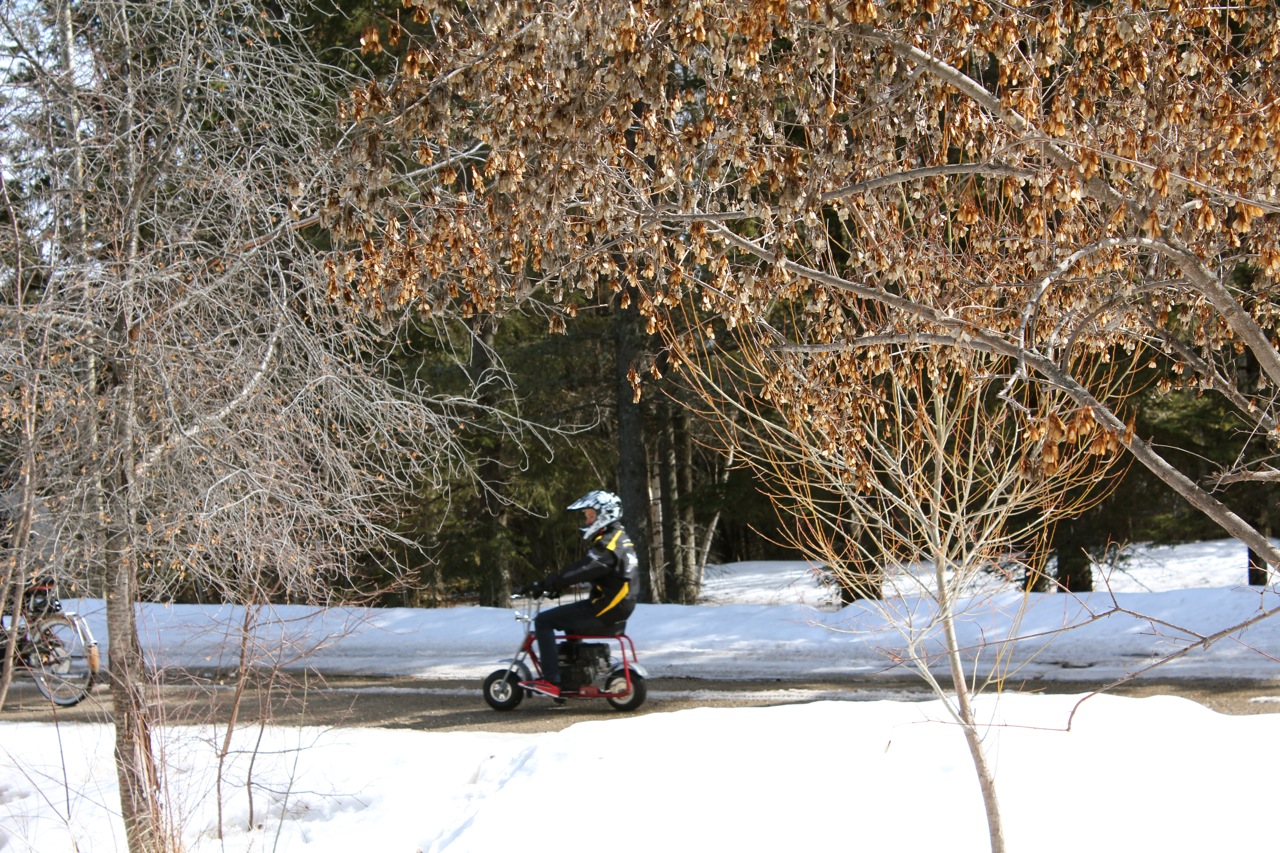
My apologies as I have completely neglected to tell you about Mitch’s ride… A mini-bike that he built himself last year from a kit… But we’ve decided that this particular story will have to wait for another post!
The final piece of the whole deck restoration puzzle is the reading deck. This space is located just outside of the dining room windows/door and it is a favorite spot to sit in the cool of the early mornings with a steaming mug of tea, facing east to watch the rising sun. In spring and fall, you can also see the glistening blue lake through the trees. As this part of the deck gets full sun from morning to mid-afternoon, it is the perfect spot to curl up with a good book (one of my favorite activities) during the cooler months. It is also a covered deck so Lucy and I sit out here during storms to enjoy the thunder and rain.
Here is a ‘before’ shot from inside of the cabin, taken last winter.
And here is the staining in progress. What a difference the darker stain makes, adding a crisp contrast to the rest of the cabin. I also scrubbed and sealed the deck floor and stained all of the window frames with the same dark stain.
The fun part was setting up the reading space. I did not buy anything new here but do plan on adding more pots of flowers for next year. This is a great time to buy pots as they are usually on sale this time of year.
Here is another ‘after’ shot of the reading deck taken from inside the cabin.
I also stained the entire front stairs. Here is a peek at the ‘before’ shot:
And ‘after’, looking so much cleaner and well-cared for.
Here is a ‘before’ shot of the entire front of the cabin: before staining the rails, stairs and window frames; before scrubbing and sealing the deck floor; before building the trellis on the patio (left) and covering up the open space with more trellis; before fixing the railing at the Zen deck and rearranging the stones near the patio. It doesn’t look too bad but the deck rails and stairs were very faded and didn’t stand out very much. Here are a few shots of how the cabin looks today. I am so pleased at how much better it looks!
My second summer has passed spent lovingly and patiently restoring the cabin. I thought this project would take a week at the most but with the spontaneous additions, repairs and rainy weather it ended up taking the entire summer! I am so grateful to B for his help and expertise!
Next year, I plan on sealing the concrete with a warm color, adding many more pots of flowers and planting a few more trees and shrubs in the front yard. I would also like to paint the green door and metal window frame a deep cranberry red.
Until then, this deck looks a whole lot better now. Not only does it adds some curb appeal and makes the cabin looked well-cared for, but the deck is now better protected from the weather. I look forward to many more projects and spending the days ahead here at cabinorganic!
There is a quiet spot on the deck, above the herb and tea garden and tucked away behind the front porch. Until now, this space was very neglected and never, ever used or visited. As B and I had been spending the summer staining, repairing and restoring the entire front deck, we finally came upon this little area and are very pleased with how the project turned out!
The ‘before’ photographs below were taken in June. The defining feature of this part of the deck is this sweet little bench built around a tree, but the tree was so over grown that it made the bench inaccessible and it also made the space feel very crowded. This is a shady spot and the tree continually drops leaves and berries, covering the deck floor which was stained almost black in color.
This is the master bedroom window. The window frame was stained the same color as the cabin and didn’t really stand out. The two bottom logs of the cabin were also black with mold (I had scrubbed off what I could before taking this picture).
There was a curious opening in the deck rails. I was told by the previous owner that they had planned on putting a hot tub out in the woods there. There is also this ‘look-out’ area at the far end where the deck rails had never been finished and many of the slats were missing.
Just beyond the look-out are some stairs leading down the to basement walkout door. It didn’t make sense to close this off so we decided to make some changes here in order to make this space inviting and connected to the rest of the cabin and woods.
While B got to work fixing the railing, I began staining the front deck rails just above the herb and tea garden (and planter) which lead to this part of the deck.
B closed up the opening with new railing and added the missing slats while I followed him with my can of stain…
Next, B removed the railing at the ‘look out’ and built three wooden stairs that connect with the stone stairs leading down to the back door.
Note: We will be moving the eavestrough so that it runs below the stairs but this will also involve digging a small trench so that we can extend the pipe about six feet to where the ground slopes away from the cabin.
I pruned the overgrown tree- which, by the way, turned out to be a chokecherry tree (and I have since made two batches of chokecherry jelly– recipes will be posted soon!). I stained the bench with the same black brown stain as the rails and now it really stands out as a focal point now.
I also scrubbed (and scrubbed and scrubbed) the entire deck floor by hand with the stiffest scouring brushes and pads I could find. The deck looked quite black, but when it was wet it was actually green… Moss? Algae? I scrubbed it until I could see the original wood again and then sealed it with a clear sealant. The deck floor is so much easier to sweep and keep clean, and it is quite satisfying to see the water bead up on the deck floor now whenever it rains instead of being soaked up by the wood.
I also stained the window frame and now the window looks sharp and crisp against the cedar cabin.
This is a very hidden, private and quiet part of the deck, surrounded by trees and in deep shade. I decided to make this a ‘Zen deck’- a place for peaceful retreat, for quiet work, or simply a place to reflect and contemplate. I found the perfect cast iron bistro set (at Canadian Tire) that has a bamboo pattern. I found the Buddha at Polly Maggo’s on Whyte Avenue in Edmonton. It is actually a water fountain and I will set it up once I find the right bowl for him to sit on. The blue ceramic garden stool that the Buddha is sitting on was purchased at Pier1 Imports.
Here is a what the Zen deck looks like now. I have added pots of shade-loving plants and just last week found a square red umbrella at Jysk. I love sitting out here, especially when it’s raining and I can sit under the umbrella and enjoy the peace of the woods.
Here is a view from the front of the cabin. As you can see, it is very dark and private.
And so another neglected, uninviting space has been turned into a new favorite place to spend quality time. I eat my breakfasts in the deep shade of this deck when it is too hot to eat on the patio, I blog and write here, and I also come here to simply sip tea and sit in solitude.
Next year, I plan on adding many more pots of ferns and other shade-loving plants in various sizes. I want to work on a painting on hang on the bare wall to the left of the window. I would like to add some hanging baskets to the tall rails and landscape the area along the stairs leading down to the back door. For now, I will enjoy watching the trees change to a golden yellow from the comfort of the Zen deck.
Do you remember this restoration project from last spring? Below is the extreme ‘before’ shot of this little promising patch of garden in the front yard taken last May. I spent a week lovingly moving stones, enriching the soil and planting a variety of perennial herbs and teas.
Here is another view of the ‘before’ stage. Please note the old, weathered stain on the deck and pay particular attention to the open area where the top of the garden meets the deck…Here is an ‘after’ shot taken last May. I had the garden all finished and planted but notice the deck and the open space at the top of the garden still needed to be addressed. Also, notice how the color of the old stain seems to blend in and downplay the beautiful deck…
This past summer as I was making my way around the huge deck with my paintbrush and can of stain, B asked me what I was planning on doing with this big, empty, unproductive space? I told him that I’d eventually like to build a planter box there for mint. While I continued staining, he instantly began working on it… B leveled the soil and then built this beautiful planter box mainly out of scraps and repurposed wood from the shed.
Once the planter box was finished he decided to take it a step further and address the empty space under the deck with some of the left over trellis from the patio project…
I love how clean this area looks now and notice the that by this time I had caught up with staining the deck in this area.
Here is another angle. The dark stain on the deck rails is a really nice contrast to the wood grain of the cabin. Instead of blending in it pops right out and frames the view quite nicely. Next year, I’d like to add a few large bright red clay pots in a variety of sizes to the concrete area for a splash of color.
Once again, here is another ‘after’ shot. As I write this, the planter is now bursting with peppermint that is waiting to be harvested and dried for peppermint tea. What was once a neglected, uninspiring spot in the garden is now productive and beautiful and adds to the ‘curb appeal’ of the cabin. The best part is that the new additions look as though they have always been there!
Stay tuned to see a neglected corner of deck turned into what I like to call, my restful Zen deck…
Since my last post on the patio projects, Brian has built a beautiful large planter box and replaced some of the front deck with trellis and I have scrubbed and stained the deck. I thought I would share some of the pictures with you so that you can see some of the work that has been taking place here all summer.
Since June, we have repaired, scrubbed, stained and renovated the entire front deck (the patio is attached to the right side of the deck). I will share all of the before and after pictures with you in the coming week in a series of posts.
Below is the planter box in progress. For most of the patio and deck projects, Brian was able to salvage odds and ends from the shed and rarely had to buy new wood.
The planter box was built to my specifications. I wanted to be able to put two large plastic pots inside so Brian measured the pots and built this custom planter box to match the trellis beside it. This box also serves as a half-wall which closes in the ‘outdoor room’ quite nicely and adds a bit more privacy when sitting at the table. By this time next year the boxes will be overflowing with flowers and tall ornamental grass, adding even more privacy.
Next year (phase 3), I plan on sealing the concrete with a warm honey color, adding two comfortable lounge chairs for the chiminea, and adding lots of large and medium pots for herbs and flowers to the patio area. I am also on the look-out for a large, circular outdoor rug.
Here is how the patio looks today:
To the left of the patio area is the right side of the front deck and it includes an interesting arrangement of rocks as a focal point. Here is what it used to look like just two months ago (this is what you look at while sitting at the patio table). Notice the old, faded deck stain which gave the cabin a sad, neglected look…
The rocks are piled quite high to high a gap in the boards. Brian decided to remove a few of these boards and install more trellis to match the patio trellis. He also kept going when he got to the cedar tree and added trellis to the decking behind and beyond the cedar. This was a lot of work and was tedious to install but was really worth it. It really makes the area feel cleaner as you no longer have to look at the uninspiring view under the deck. I also removed the metal fencing from around the cedar.
In progress…
Below is the final project as it looks today. Once the trellis was in place I no longer had to use so many rocks in the arrangement and I think having less improves the look. The dark stain on the deck adds a very nice crisp contrast to the cabin and it makes the rocks stand out more instead of blending in with everything else around it. I put a bright red pot on the right side of the rock platform and plan on putting a splashy water fountain in the main area of the rock platform (phase 3). I will also be adding some rock garden perennials in the the crack and crevices of the rocks.
These improvement to the deck and patio area cost very little money and a reasonable investment of time, creativity and elbow grease. With just a bit of effort, we have transformed an open and exposed, uninspired area of concrete into a cozy outdoor room that we use constantly now for meals and evening fires.
In a few days I will show you the improvements we made to the herb and tea garden, the creation of a ‘Zen deck’ and the freshening up of the reading lounge…
It’s been very exciting this past month as I have been focusing on the patio and deck area. What started out as an uninspiring, unfinished area that wasn’t much use to me is now one of my favorite places to eat, enjoy a fire and simply sit and enjoy the cabin.
There is a large concrete patio that extends from the driveway, along the deck and into this circular open area. I never liked it much as it looked so grey and institutional and seemed to be at odds with the surrounding wilderness. I decided to start last summer by staining the arbor a black-brown…
Hops grow up this arbor and here is a picture of how the arbor looks once the vines climb and grow over it.
Here is a before shot from behind…
And after staining. I find that this structure has much more impact now with the darker color stain.
Here is another structure that was never finished. I stained that as well…
And here are the two structures stained. This is as far as I got last summer. Note the circular concrete pad. It is the perfect spot for a patio set but I never used it as it was too hot and exposed with no privacy from the road.
Just this past month, I picked up where I left off with the project. B was a great help and had the creative idea of lifting the railing on two of the panels so that the trellis would provide more privacy.
What a difference!
I definitely have the privacy I was needing!
Here is the trellis all stained. It looks amazing now and adds to the comfort of the space as it provides shade and blocks the wind. B donated a small chiminea and we have been using it regularly for small fires.
This is still a work in progress. I would like to seal the concrete with a bit of a beige tint to warm up the grey. We are building a planter box to add even more privacy and I’d like to buy a bunch of large pots for flowers.
Last week I started staining the main deck and B added trellis, new railing and slats where they were missing and built a large planter box just above the herb garden along the deck. Everything is looking so elegant and I am impressed that such a low budget project could have so much impact and add to the curb appeal of the cabin. I just have a bit more staining to do and then I will post Phase 2 to share our hard work with you! In the meantime, I have a new cozy spot to curl up and simply enjoy life…
At last! At long last, the greenhouse has a new French door! Let me remind you of what the greenhouse looked like last year before I tackled the restoration project:
I don’t think that the greenhouse had been used in quite a few years. Of course, I immediately fell in love with it!
Here is the ‘almost-finished’ project last spring. The last thing it needed was a new door. The old is was hollow and had a family of bats living in it. All summer long, whenever I was working in the greenhouse I could hear them scratching away in there.
Not too long ago, my wonderful friend B found this French door in his sister’s garage. As it was no longer needed he brought it over to the cabin, cut it down to size and moved the door knob from the old door to this new door.
Installing it was a challenge as there wasn’t a single straight or level line in this ramshackle building! Thankfully, B was up to the task with chisels and planes! Once the door was installed, I applied two coats of primer, two coats of exterior black paint and a bead of black exterior-grade caulking around the windows, inside and out (again, using painter’s tape on the glass for this task to get a perfectly straight line).
I spent yesterday afternoon vacuuming cobwebs and washing the entire building inside and out. Then polished up the windows and installed a small hook and latch to keep the door from blowing open (the latch of the old knob doesn’t always catch). As you can see, the glass door will let in much more light. I will build a few bat houses to install nearby as I really do appreciate them.
Finally, I planted the plants! This year I put in cherry tomatoes, two types of roma tomatoes, many herbs (especially basil), and a variety of salad greens in the back as they don’t mind partial shade. I also reserved an small area for my friend E who is going to have her own bit of garden space and will plant some of her own seeds next time she comes over.
Now onto the Medicine Wheel garden project where today I am building raised beds…:)
This shed is the main view from my study window and after a year of looking at it in a sad state I decided that it was time to freshen (and brighten) up the view a little. Below is a picture that I took one year ago. It’s hard to see but there was quite a bit of scrap wood (with rusty nails sticking out of them!) lying around and I also had this full sized basketball net that was way too heavy for me to move myself. As much as I like ‘old weathered things’, this shed looked a bit sad, tired and neglected.
Here is a close up ‘before’ shot. The basketball net was rescued by my wonderful friends and neighbors who live just down the road (who took it away, cleaned it, fixed the net and made it look brand new). The side door was bolted with no key in sight. The same neighbors brought bolt cutters and cut the bolt for me. (Thank you!) Now I can use the side door and lock the main doors from the inside instead of propping this heavy beam against them.
I started by cleaning, scraping and lightly sanding the wood. Then I used a solid exterior stain to cover the green paint on the top and door molding. I like how it quietly blends in with the old shingles and already makes everything look a little cleaner.
Then I put two coats of exterior grade primer over the doors. I originally had planned to stain the doors but in looking at the samples at the hardware store I found that I wouldn’t be able to achieve the brightness of red that I wanted… so paint was the next option even though it would require more work (six coats over all instead of two). Also, I excavated the concrete pad in front. It looks a lot tidier now.
Then I applied four coats of red paint. Yes. Four. With 24 hours of time to dry in between each coat. (A patient labor of love.) The first two coats looked horrible, they always do with bright or deep colors. Don’t let this discourage you from trying color. It is well worth the effort when it’s all done!
Today I painted the hinges black using metal paint.
I still have a few more little things to do in order to finish the shed. I need to continue clearing out the piles of bits and pieces of wood (and tar paper and garbage) on the side and back of the shed and make sure that the dirt isn’t piled up against the wooden walls. I will stop at Ellerslie Garden Centre sometime in the coming week to look at their pounded cast iron door handles and other rustic hardware accents. I will put a handle on the side door and possible something decorative for the two front doors just to break up the red a little.
This shed is special to me because it is the only original building on this land. It was here with the original farmhouse that was torn down to build this cabin about 38 years ago. It is a sturdy building, built on a concrete pad and foundation. It also has power which is handy as it is near where the chicken coop is being built. This shed houses the lawn tractor and stores the wood that I have salvaged for future building projects. I may also start parking the quad here. (I use the quad for shoveling snow as it is now equipped with a shovel -again, thanks to my handy neighbors!).
Here is the new and improved view from my study window. No longer sad and neglected, the shed is bright and cheerful, loved and appreciated. It even looks a little proud as it appears to stand a little straighter (if only sheds could talk). Below is the view that I am looking at as I type these words. Notice the uninspiring woodshed to the right… Another project!!!
When we bought the cabin last fall, we inherited this quaint little greenhouse. I love that it is made with recycled windows- a great repurposing project! Unfortunately, it had been neglected for many years and was currently being used to store junk. It needed a lot of work. The paint was almost completely worn off, the wood was rotting in places, ten of the window panes were cracked or missing altogether, there was broken glass all over the ground under the extra windows at the back of the greenhouse, and it had become home to a large colony of ants and a family of bats.
Here is a shot taken during the winter. I was told (by our realtor) that the tire is from a Model T Ford. Any collectors out there?
Of course I fell in love with the greenhouse immediately and couldn’t wait for spring to arrive when I could take on the enormous task of lovingly restoring it back to its original purpose: a vibrant place to grow things here in our short Alberta summers.
Inside, the soil was very dry and dusty and covered in bits of plastic sheeting that disintegrated into a million tiny pieces whenever you tried to pick it up. There were layers and layers of spider webs everywhere.
When spring finally arrived, H and I began by moving all of the junk out. I cleaned the interior thoroughly using a broom, a shop vac and buckets of soap and water. Just under the roof (not pictured here), there is a large rectangular reservoir made of tin. I believe it was used to hold water, which then flowed into a tank which directs the warm water into the irrigation hoses that are buried in the soil. This reservoir was one-quarter full of bat guano! I had to get up on a ladder, and wearing a mask and goggles scraped and swept up bucketfuls of bat poo. I also had to remove the birdhouse as it had an active wasp nest in it. I did this early in the morning while it was still cold and the wasps presumably sleeping. I wrapped the birdhouse in a pillowcase (in case they flew up and swarmed me), gently removed the nails holding it in place and put the birdhouse carefully on the ground some distance away, removing the pillowcase.
I replaced all cracked and missing windows with panes taken from the extra windows that were once leaning against the rear of the greenhouse. Then I taped all of the window glass with painter’s tape, inside and out, in preparation for painting. As you can imagine, the taping was very tedious with all of those individual window panes. (And I taped all of the windows THREE TIMES during this process!) We should have bought shares in the company before I started this project!
Next, I primed all of the wood, inside and out. I had to give it two generous coats as the first coat seemed to be completely absorbed into the old, dry wood.
Here is a look at the interior after priming…
Here is a view of the back of the greenhouse…
Next came two coats of exterior semi-gloss black paint. The roof still looks awful as it needs to be replaced but that will have to be a future project.
Once the paint was dry, I took off all of the painter’s tape and washed the widows thoroughly. Then I re-taped the windows in preparation for caulking. I caulked the interior windows with black caulking, peeling off the tape before it set. This makes the caulking job look ‘clean,’ leaving crisp straight lines. Once again, I cleaned the windows.
Here’s a corner view. You can see where I transplanted some peonies that were previously growing in the front yard. My neighbor C also gave me some rhubarb, which I planted on the left side here.
Here is a view of the front. There is still an old damaged door (not shown here). It has some bats living in it so any time I am working in the greenhouse I can hear them scratching away in there. I will be replacing this door with a secondhand French door from the Architectural Clearing House in Edmonton. Unless any of you have a glass door you want to sell me on the cheap? I’ll even cook you dinner out here as part of the deal…
Here is the back of the greenhouse. I hung up some old rusty tools that I found around the property. I also moved the concrete blocks to the future chicken coop location as they will come in handy as part of the foundation there.
Here are a few shots of the interior…
Inside, H and I removed half of the dry, dusty soil. We added and dug in manure, compost and potting soil and then topped this with three inches of mulch to hold the moisture in. This picture was taken in early June.
I planted four different kinds of tomatoes, six different kinds of chili peppers, six different kinds of basil, parsley, cilantro, summer savory, tarragon, chives and there is a nasturtium plant in there as well. (I also have lots of herbs growing in a separate herb and tea garden as well as in my veggie garden).
Here is a shot taken just today. Notice that the tomatoes are growing up a length of string for support. This is old baling twine that I found near the barn when we were cleaning the manure off of the concrete pad. A length of this twine is tied to a nail on a beam above, the lower end is loosely tied to the base of the tomato plant while it is still young. As the tomato grows you gently wind the string around the plant. Be sure to provide some slack so that the twine doesn’t become too tight.
This is still a work in progress. I still have the door and roof to replace and I would like to caulk the exterior windows. I plan on putting a flagstone path in the ground at the front door along with a few large red clay pots with some bright red flowers. I am also looking for a weathervane to install on the roof. I have planted a few vines at the two front corners of the greenhouse, which, I hope over time will grow up the corners and under the roof line. Next summer, I will install brackets for two hanging baskets for more bright red flowers (yes, I really like red).
All in all, this has been a very useful restoration project so far. Did I mention that the greenhouse already has power, water, shelves to store my terra cotta pots and a little potting table? As it has been a cool, wet spring and summer so far here in Alberta, my plants in the outdoor gardens are healthy but still small. Meanwhile, the plants in the greenhouse are thriving and gigantic in their warm, humid little home. One of my tomatoes is now even touching the ceiling, it has grown so high!
I hope you enjoyed seeing this restoration project take shape. I actually just painted the back wall and installed the rusty tools just this afternoon. We have had so much rain that finishing the painting kept getting postponed.
I’ll keep you posted on any further developments with the greenhouse. In the meantime, I look forward to hearing about your own gardens and restoration projects!